Search This Blog!


Email

Kid-Friendly Mocktail Bar

Perhaps the most quintessential tradition of New Year’s Eve is the champagne toast, but what about everybody who doesn’t participate in a sip of bubbly? Whether you’re under age or prefer to abstain, you deserve a fun and fancy drink to toast with at midnight. That’s why we love a good mocktail—or cocktail without alcohol. With a well-stocked mocktail bar, you can mix and match ingredients to create tasty kid-friendly drinks.


Cranberry Kiss Mocktail 
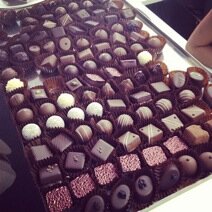
Image via Eat Drink Pretty


In fact, we think all these fun possibilities are even more delicious and interesting that traditional bubbly. With a few basic ingredients, you can make so many combinations. Use your creativity to whip up some yummy drinks that’ll have all your guests saying, “Champagne who?”


To create well-balanced mixed drinks, you need a few key components—mainly something bubbly and something sweet. Of course, you don’t need carbonation, but it is New Years, after all. Customize any ingredients you want to make your bar more sophisticated (cucumber, black currant, fresh herbs) or childproof (orange slices, fruit punch, crazy straws). Here are the key components to creating a fabulous mocktail bar:


- A bubbly base: Ginger ale, sparkling cider, Sprite or Sierra Mist, seltzer—these clear sodas are the perfect vehicles to add a little spritz to your glass. Pick your favorite or have a few kinds available.


- Juice: Orange, cranberry, pineapple, lemonade, peach nectar… these fruity liquids add sweetness and pack the flavor punch for your mixed drink. Stock as many as you like, but a good base is usually three different options.


- Fresh fruit: Whether it’s muddled or used for garnish, fresh fruit is delicious and gives your glass a festive touch. Doesn’t it just feel fancier? Berries and citrus are usually best—raspberries, blackberries, lemons, and limes, etc—but feel free to try any other favorites.


*Another fun tip: Try freezing berries to create a tasty alternative to ice. They’ll keep drinks chilled without watering them down and look prettier, too!


- Fresh Herbs: This is optional, and perhaps for the more adventurous, but some fresh herbs can really bring your mocktails to the next level. Mint, thyme, basil, and rosemary all add deep and complex flavors to an otherwise simple drink. If you’re looking to ease your way in to adding a little green to your glass, try starting with mint.


 Rosemary Citrus Spritzer

Image via The Kitchn


These kid-friendly bar basics will ensure tons of fun drink creations. Let the little ones play mixologists and come up with their own delicious concoctions. Keep in mind you can always tailor this to your friends’ and family’s preferences. If you’d like some recipes on hand, here are a few great suggestions:


Rosemary Citrus Spritzer from The Kitchn


Rudolph’s Nose from NCADD


Cranberry Kiss from Eat Drink Pretty


Strawberry Crush from La Fuji Mama


Alcohol content certainly doesn’t have the market cornered on festivity. Upgrade your cup of soda or juice this year and make a fancy drink worthy of starting the New Year with. Cheers!

Print
Published by , on December 31st, 2013 at 3:28 pm. Filled under: adults,food art,holiday,kids Tags: , drinks, , , , , , mocktails, • No Comments

Gingerbread Real Estate

Did you know gingerbread houses became popular in Germany during the 1800s after Hansel and Gretel was published? That’s pretty spectacular considering that in the fairytale, the beautifully edible house is used to lure two abandoned children into a witch’s trap. One wouldn’t think that makes a great selling point for creating confectionery cottages, but it seemed to really catch on and become a Christmas tradition. After all, that witch was on to something—she knew Hansel and Gretel couldn’t resist an enchanting gingerbread house… how could we expect anyone else to?


 Sweet and Simple Gingerbread House

Image via Shopgirl


This tasty craft comes in an array of sizes, shapes, and levels of difficulty. For those who need a bit of a head start, there are kits available to help create the basic structure. Others love starting from scratch and baking their own gingerbread. Some people take gingerbread houses so seriously that they create life-size structures or participate in competitions. Whatever your approach, this is definitely a fun and delicious activity to try on your own or with the whole family.


 Pretzel Log Cabins

Image via Worth Pinning


 Rice Crispy Cottages

Image via Land O Lakes


And don’t feel limited to gingerbread! Some folks have started branching out and using other delicious treats to build their homes’ foundations. Try pretzel rods to create the effect of wooden logs. Or use rice crispy treats to suggest stones or stucco. These houses can be as elaborate or simple as you want. Don’t underestimate the beauty of simple gingerbread and white frosting. For those who like a little more opulence, grab colorful candies and make a full-on edible estate! Piped icing, nuts, cereal, and candy canes also make excellent decorating supplies.


 Gingerbread Mansion

Image via Cake Central


What gingerbread house approach is your favorite? Clean and simple, cozy and colorful, or grand and luxurious?

Print
Published by , on December 21st, 2013 at 10:52 pm. Filled under: adults,Arts & Crafts,food art,holiday,kids Tags: , , , gingerbread, gingerbread houses, , , • No Comments

Spooky Pretzels

One of my favorite snack foods has got to be the pretzel. It’s crunchy and salty, it’s tasty on its own, and it pairs well with both sweet and savory ingredients. You can dip it in chocolate or cheese and both will be delicious (just not at the same time… unless you’re really adventurous).


Sometimes it’s fun to pick a favorite snack and then create variations on a theme with it. Here are a few different ideas for bringing Halloween flair to some yummy pretzel treats.


These pumpkin pretzels from Make Bake Celebrate are too cute for words! Chocolate-covered and dipped in sprinkles, they’re the perfect salty-sweet combination. Add leaves and stems with some piped chocolate for added detail.

 Chocolate Pumpkin Pretzels

Photo via Make Bake Celebrate


You can never have enough chocolate covered pretzels! For a fun variation on the same flavors, you must try these Frankenstein pretzels! Grab pretzel rods, green melting chocolate, black gel icing, chocolate kisses, and shredded coconut. With some simple assembly, you can make the perfect creepy cuties to compliment your bright pumpkin pretzels.

 Chocolate Pretzel Frankensteins

Photo via Simply Designing with Ashley


Finally, let’s finish up with a savory pretzel dish. With some pretzel sticks, string cheese, and chives for garnish, you can create the most adorable witches’ brooms. Cut up the string cheese to act as bristles, stick in a pretzel to be the handle, and tie on a chive if you like (you can skip this last part if you’re not a chive fan).

 Pretzel and Cheese Brooms

Photo via


Yum! These make perfect Halloween treats, but are also great festive snacks for any time—be it in the classroom, after school, or for a sleepover.


Which of these variations is your favorite? Do you have any other spooky snack ideas?

Print

In the Loop

It’s not often you find art supplies you can also eat, but when you do… it’s sure to be a tasty crafting session! Because of their bright colors, Froot Loops are perfect for art projects. You can pretty much find an excuse to craft with them every time of year. Right now, try creating some autumn-themed pictures with subjects such as trees with changing leaves, pumpkins, maize, or apples.


For this project, grab some Froot Loops (and maybe Cheerios, depending on what colors your picture requires), glue, and some sturdy white paper. You’ll want a slightly thicker paper so it can handle the weight of the cereal. To round out your picture, you can also use paint and construction paper.


Before you start, take a pencil and create a rough outline of your drawing. If you want to use paint or colored paper, add it to your white paper first before starting with the cereal. Now, sort the colors you’ll need and arrange your Froot Loops on the page before gluing them down. Once they’re all glued, let the whole thing dry.


Finally, hang your fabulous picture up and eat the leftover Froot Loops!

  Froot Loops Fall CraftsPhoto via Putti’s World

 Froot Loops CornPhoto via Musings of Me


Bonus! If you want to get a head start for Thanksgiving…

 Froot Loops TurkeyPhoto via Putti’s World


You could create one of the ideas shown here or try something new. Work on a batch of Halloween themed Froot Loops drawings this week. What are you going to create with your Froot Loops? Do you have a favorite kind of food to craft with? Or a favorite craft to make with food?

Print
Published by , on October 24th, 2013 at 2:37 am. Filled under: Arts & Crafts,food art,holiday,kids Tags: , , , , , , , , No Comments

Creepy Cuties

It’s just not Halloween until there are some sweet treats around! Save the wrapped candy for trick-or-treaters and add a little homemade flair for October festivities.


These spooky sweet treats are sure to be a hit!  All featuring marshmallows, they’re easy to make and more cute than creepy. With a few bags of marshmallows and some other simple ingredients, you can create your own rice krispies jack-o-lantern, chocolate and marshmallow witch, and marshmallow ghost.


These fun snacks provide the perfect balance of spooky and sweet—they’re festive without being scary—great for younger kids. Plus, since they mostly just require assembly, little ones can help you in the kitchen. They make perfect classroom snacks, Halloween party favors, or just festive desserts. For specific ingredient lists and directions, check out the source links.


Use the marshmallow as a binder for these deliciously sweet pumpkin rice krispies treats.

 Pumpkin Rice Krispies TreatsPhoto via Food Family Finds


No baking or cooking required! Just gather ingredients and assemble these spooktacular witches.

  Marshmallow & Chocolate Witches

Photo via Taste of Home


Keep things extra simple with these creepy-cute ghosts. All you need are marshmallows and an edible food pen (consider gel icing as a substitute).

 Marshmallow Ghosts

Photo via Cook Play Explore


What are your favorite Halloween treats to make?

Print
Published by , on October 16th, 2013 at 11:55 pm. Filled under: food art,holiday,kids Tags: , , , , , , , No Comments

Playing with Food

It always seemed like the official party line at mealtime was, “Don’t play with your food!” Well, the times, they are a-changing… A creative movement sweeping across kitchens and social media everywhere lately is food art. By transforming ordinary dishes into extraordinary pictures, many cooks, parents, and artists have been turning each meal into a cultural experience.


With all the beautiful colors and textures found in different kinds of food, it seems quite natural to turn them into art. This makes food preparation an even more creative experience, plus meals become that much more fun to eat!  Bonus: it’s a great way to excite little ones about eating more healthy foods, like fruits and veggies. When the broccoli florets are forming the treetops in a magical forest, it’s a lot tougher to reject them!


You don’t have to be an expert chef to compose clever dishes. Just have fun seeing what picture you can create with what ingredients you have.  It’s more assembly than anything else. You’ll be amazed at what you come up with!


 Food Art by Samantha Lee

Photo via Samantha Lee, Eatzy Bitzy

 Food Art by Idafrosk (Instagram)

Photo by Idafrosk (Instagram), via Handmade Charlotte

 Food Art by bambini_pucillo (Instagram)

Photo by bambini_pucillo (Instagram) via POPSUGAR moms

The gorgeous final products prove that you can be creative just about anywhere. Let the refrigerator be your palette and the plate your canvas!


Have you given food art a try? Would you? Show us your creations!


Print
Published by , on October 10th, 2013 at 8:54 pm. Filled under: adults,food art,kids Tags: , , , , , , , No Comments

Cute Candy Corn

Now that October has arrived, Halloween is on the horizon. That means costume planning, spooky decorations, and of course… candy and treats! Since it’s only the beginning of the month, one way to slowly start gearing up for the holiday is to incorporate things that work for both fall and Halloween.


The perfect solution: a little candy corn décor! This quick and easy craft is perfect for setting the tone for October… plus it has pretty fall colors! Bonus: it’s simple and safe enough for kids to work on, as well.


 Yarn Candy Corn

Photo via Danielle, My Life as I Pin It


You’ll need yarn (white, yellow, and orange), scissors, glue, and a foam cone (in a pinch, you can create your own cone with some poster board and tape).


Start at the bottom with your yellow yarn. Glue the end to the foam (you may also be able to just tuck it in the back… depends on your cone) and start wrapping! Once you’ve gotten about a third of the way up, cut the yarn and glue or tuck in the end. Next up: orange! Repeat the process with your orange yarn, and finally finish up with white to the top. Tada!


 Yarn Candy Corn

Photo via Sarah, Thrifty Décor Chick


These candy cuties add some festive fun to any room without going too overtly “Halloween” too soon. But as the month goes on… look out! More delightfully spooky projects to come.

Print

Pumpkin Vase

One home decoration that’s in style all year long is the floral arrangement. Though the colors and variations may change depending on the season, fresh plants and flowers are never out of place on the table. This autumn, give your vase a seasonal update by using a pumpkin to hold your blooms.


You’ll need a pumpkin (orange, white, or otherwise… your pick!), a knife to carve, a glass or vase, and of course, your flowers.

 Natural pumpkin vase

photo via Mother-Daughter Press & Gay Bumgarner Images


Start by cutting a round opening on the top of your pumpkin—just large enough for the design you want to arrange, and to fit your glass inside. Gut the pumpkin and remove all the seeds and goop (I believe that is the official, scientific name for it… goop).


 Glass vase inside pumpkin

photo via Flower Duet


Once the inside of your pumpkin is nice and clean, fill your glass or small vase about halfway with water and place it inside the pumpkin. Finally, put your flowers in the glass and arrange as desired.


 White Pumpkin Vase

photo by Roberto Caruso via Chatelaine


Depending on how you carry out this project, the results can range from casually rustic to incredibly chic. Consider which look you want when you’re planning your centerpiece. Feel free to experiment with painting your pumpkin a different color and using various kinds of foliage or color schemes to bring your idea to life. This would make a beautiful Thanksgiving centerpiece or just a lovely addition to your table this fall.


Gold Pumpkin Vase

photo uploaded to Pinterest

What tips or tricks do you like using to give your space or décor a seasonal update?

Print
Published by , on September 24th, 2013 at 10:18 pm. Filled under: adults,Arts & Crafts,Design,food art,holiday,kids Tags: , decorate the table, , , flower pot, , home decor, , pumpkin glamour, pumpkin home decor craft • No Comments

Scribblin’Spiration

Time for a new dose of inspiration to get your hands scribbling!

Do you have a sweet tooth? What are your favorite sweets and candies to splurge on? We all have our usual preferences, but did you ever stop and think how wildly diverse candy is? Chocolates, gummies, sour candies, bubblegum, licorice, taffy, lollipops… the list goes on and on!

ChocolatesImage: Wallpy

Peach RingsImage: Dylan’s Candy Bar

That makes it the perfect inspiration for some scribble action. Grab your pencils, crayons, markers, or paints and get ready to explore the sweet world of candy.

The fun thing about sweets is that they’re just as yummy to look at as they are to eat. With bright colors, nifty patterns, and differing shapes and sizes, this sugary snack group is a feast for the eyes as well as the tongue. So it’s no surprise that artists like Wayne Thiebaud and Margaret Morrison find it such a fascinating subject. They focus on extreme detail and texture when creating their incredible still life works.

You can follow these painters’ leads and try your hand at still life sketches of sweet treats or take the inspiration a bit more conceptually.

Three Machines by Wayne ThiebaudThree Machines (1963) by Wayne Thiebaud, Image: Wikipedia

Gummi Bears by Margaret Morrison 
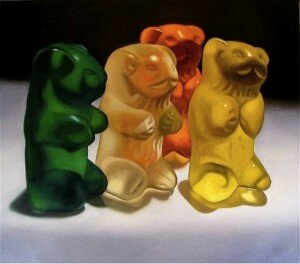
Gummi Bears (2008) by Margaret Morrison, Image: Art Fumes

Let the rainbow of vivid colors, bevy of interesting textures, and myriad of shapes and sizes inspire and inform your scribbling! Pay attention to the labels and packaging… or just focus on what’s inside the wrappers. Perhaps you’ll want to try an extreme close-up of a sour gummy worm’s texture, or a collage of your favorite treats, or even something totally abstract yet inspired by the elements of candy. Draw what you think a certain candy tastes like. Or use the color scheme of certain brand or flavor to create a picture.

Assorted CandyImage: Sparknotes

 Enjoy your extra-sweet scribbling treat! What’s your favorite kind of candy?

Print
Published by , on July 12th, 2013 at 9:32 pm. Filled under: adults,Arts & Crafts,food art,kids Tags: , , , , , , No Comments

Cap Off the Year with Chocolate

If you live in a college town or anywhere near a college campus, you know what time of year it is… GRADUATION!  It seems every other day this month, kids are receiving diplomas and throwing up their caps. And before you know it, next month it will be time for preschool, elementary, middle, and high school graduations. If you have any grads in your family, why not celebrate this milestone with some sweet treats?

Chocolate Graduation Caps Photo: Bakerella

These chocolate graduation caps are simple to create and easily customizable for school colors. You can make them chocolate lollipops or just clever candy sans the sticks, depending on your preference. To make them, you’ll need: miniature Reese’s Peanut Butter Cups, melting chocolate, chocolate squares (Dove or Godiva make good ones, but even small chocolate covered graham crackers or square chocolate covered wafers will do), miniature M&Ms, sour strings (Airheads Extremes Rainbow Berry Sweetly Sour Belts work great), and lollipop sticks (optional).


You can work in any order you prefer, but we’ll start with the top of the caps. Unwrap your chocolate squares and separate your sour belt ribbons by color. Choose the school color and cut or tear a small piece off (about an inch to an inch and a half in length—you can eyeball this). Draw a thin line of melted chocolate with a toothpick on the chocolate square from the center to an edge and glue on the sour belt string and a mini M&M to match.


Now for the bottom: chill your peanut butter cups in the freezer for a few minutes so the wrappers remove smoothly. If you’d like to make these as lollipops, let the cups return to room temperature (on a sheet of wax paper), then dip the end of a lollipop stick in melted chocolate and carefully insert it about halfway into the peanut butter cup and let it dry.

 Graduation Cap TreatsPhoto: Family Life with a Mom Who is All Hart

Once hardened, adhere the tops to the bottoms with some more melted chocolate and let dry. If they’re lollipops, stick them into a Styrofoam block to dry standing up. If they’re without sticks, leave them on the wax paper.


There you have it! Tasty, adorable, and celebratory treats worthy of your graduate! These are very easy to customize and substitute ingredients. For example, you could use icing or candy coating instead of melting chocolate and you could use pull-apart Twizzlers instead of sour belts. You could even use white chocolate for all the ingredients, so feel free to play around and see what you come up with. Congrats to all the classes of 2013 on their accomplishments and the many more to come.

Chocolate Graduation LollipopsPhoto: Bake Me More

Print
Published by , on May 23rd, 2013 at 5:12 pm. Filled under: Event,food art,kids Tags: , , Event, , graduation, sweets & treats • No Comments