


Scribble Artist Interview with Andres Amador!

Jersey Beach Art Festival. Andres working. Photo: Stepane Gimenez Photography
Scribble Town (ST): The world is your canvas! Visual artist Andres Amador proves that to be true with his landscape art whose primary canvas currently is the beach. After you read more about Andres I think you’ll be inspired to create with the earth and appreciate it for all its beautiful components that make it fresh, colorful and alive.
Andres Amador (AA): I call myself an Earthscape Artist, though this feels to more capture the heart of my pursuit- engaging the natural world at the landscape level using natural materials.
ST: I think Earthscape Artist encapsulates what you are doing and what the art is about! Where are you and what are your days like?
AA: Currently I reside in an open-walled, safari-style tent on a family homestead farm outside Grass Valley, California. When I am not working on the farm, I am working on projects for clients and developing the next iterations of my art.
ST: You live and work with nature- both with sand and soil. When did you start creating beach murals?
AA: I started in 2004. The idea came to me as I was studying crop circles and sacred geometry while on vacation in Hawaii. I was on the beach explaining concepts to a friend when, like a bolt from the blue, I saw what could be possible on the beach.
ST: Wow! I can imagine the blue bolt came straight out of those Hawaiian blue ocean waters! You never know how these ideas will volcano out from your imagination. When it comes to visualizing your projects, does the place inspire your style or is it the purpose of the drawing that takes precedence?
AA: In general the design is primary. However, there have been opportunities in which the shape or limitations of a location suggested a certain way to work with it. There have been rare moments in which a location inspired a design.
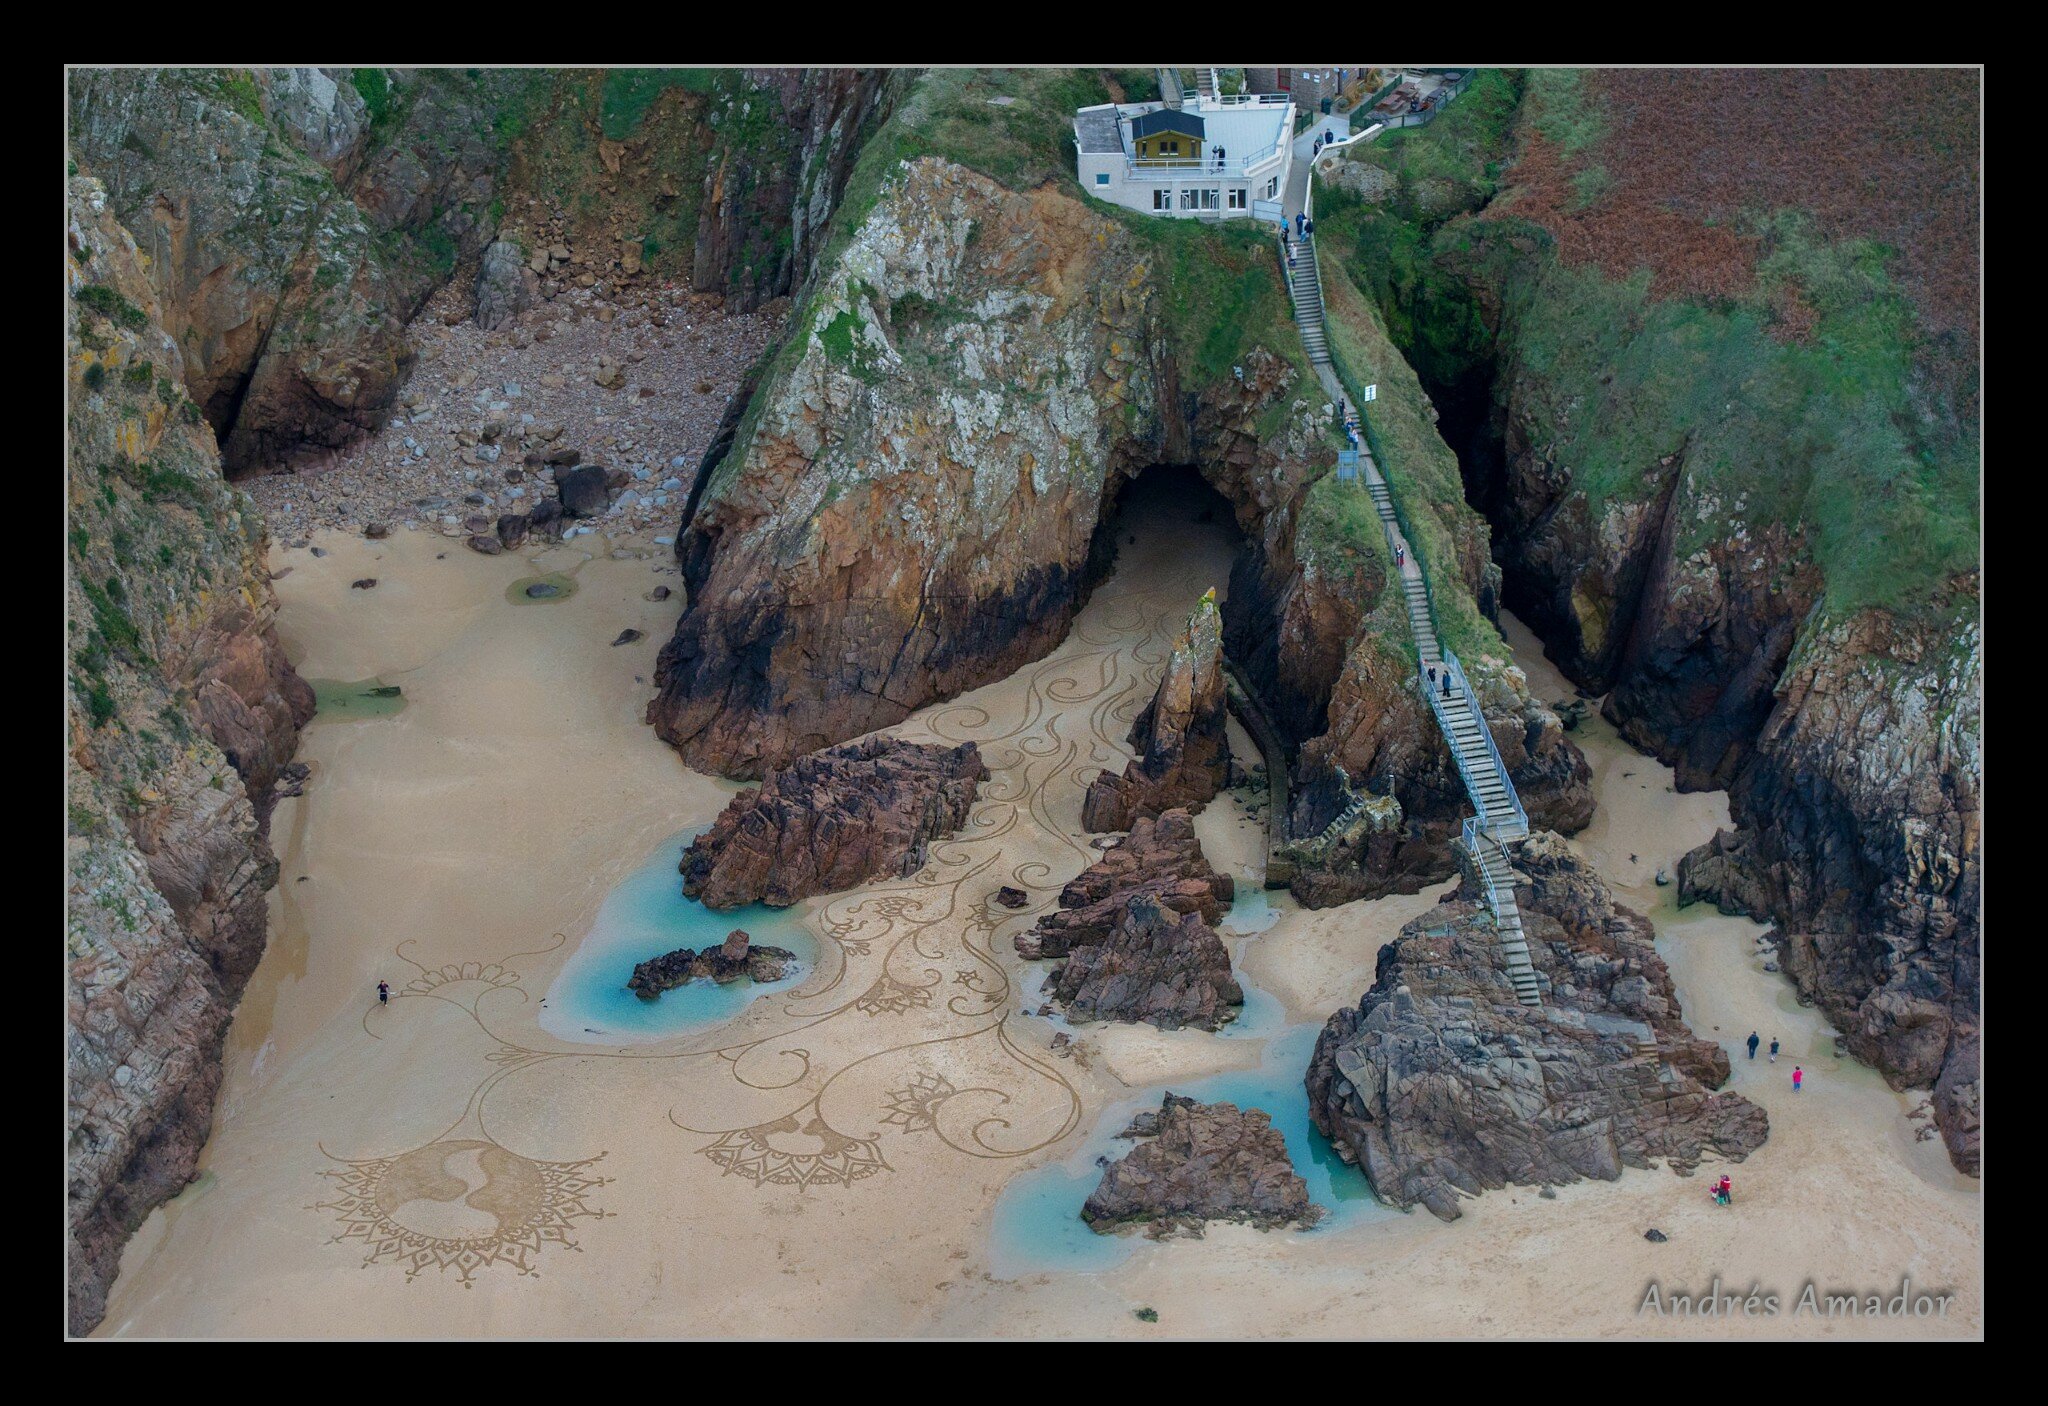
Inspired by the cave and the narrow channel leading from the cave to the larger beach. I started way at the back of the cave where the sand started. In my mind the cave was breathing flames which turned into vines, then flowers off of which bud planets and stars. Plemont Beach, Island of Jersey. during the MyMemory.com World Beach Art Championships.
Currently, now that I am using a remote controlled aerial camera, I will have the opportunity to truly work with the landscape- to know what it looks like from vantage points higher than I have been able to see from before and to capture the imagery. This is the cutting edge of my art development and has me quite excited.
ST: It’s great to see how technology is advancing your artwork not only with documentation but also with accessibility. I can really see how the cave and the rocks guided the flow of your design elements! What other forms of creativity do you do?
AA: At the moment I am appreciating origami- its tough! I also love contact improvisation dance, in which I have been developing a signature style. Sculpture weaves in and out. Cooking is a major love. Many creative thoughts pass by me all the time, like butterflies flitting about. It feels as though I am capturing and expressing such a tiny percentage at any particular time. As my major expression at the moment is the earthscape art, many of my ideas turn towards pushing its boundaries. Often this means entirely new lines of creativity being born and adapted to the beach.
ST: For a person that has so many different creative interests, sometimes it’s also good to just put more attention to one project or medium. How do you start planning your projects? Some have been very big productions requiring a lot of help from others! What is then your process for creating it on the beach?
AA: The main thing I do is somehow capture the idea- whether as a sketch, a written note, a phone message to myself, a recording- whatever I have on hand. For the past 10 years I carry with me practically all the time a pencil case with pencil, sharpener, and flash cards. I have found flashcards to work the best for me. With them I can do many sketches of ideas and make variations then later group them into categories and later still select a few that would make good candidates for being on the beach. I also carry an iPod touch, the kind with a camera. I use it for taking notes, for doing recordings, and most usually for taking quick photos of inspirational imagery.

Andres Amador’s example of a flash card with a design sketch.
If there is geometry to work out then I will use Illustrator on the computer as it makes the process, and being perfect, very easy (with the geometric designs perfection is important).
Once on the beach I will turn to a number of techniques. Often I am coming up with new ones to fit the needs of the design. In general though, the main thing I am working with is keeping a sense of what is happening around me while I work from the inside. Its an acquired skill, keeping it together. With the geometric is about knowing the steps I have set for myself. With the organic designs its about knowing the process I am engaging, which shifts according to the design. I am always learning more. Now that I am using an aerial camera, the scale can go even larger, which means that the lines that have generally been good enough now much be much much larger to be visible. So there’s a constant re-orienting. For me that’s part of the fun. There is no ‘way’ to do it. It’s a constant exploration.
Here’s a guide I made to create a geometric design,

Torus-recreation
which became this:

Ocean Beach, SF
Below is a photo of an organic design.

Ocean Beach, SF
ST: I really like the impermanent aspect of your work. So much effort only to last for a short time. I wonder in what ways do you document your work (to make it permanent : ) ).
AA: Impermanence was not an aspect I was looking to engage when I started. But its the overwhelming feature of the artwork. Often as I am working on a piece it is being simultaneously washed away. I was being filmed recently and as I finished and the film crew was flying a camera up, a huge wave bit into the art- too soon! We had to redo the creation the next day (fortunately we had that option!). Prior to this art form I was doing large sculptural installations. I still have a garage full of my art. I can’t let it go! With the beach, I have no choice, which is refreshing ![]() Of course I do take care to capture my creations and so am dealing with digital detritus(!)
Of course I do take care to capture my creations and so am dealing with digital detritus(!)
If someone didn’t know how large my works were, the designs alone would not be so impressive. But knowing that so much effort went into something with such a short lifespan creates a different impact. Attention is given to the work and the reasoning behind it. Philosophically, the aspect of impermanence has had a big impact on me. In the end, our own existence is temporary. Nothing that is made will last forever. We subconsciously anchor ourselves to what we feel is solid in the world. We act as though the lives we live have stability to them. But that is an illusion. When upheavals in life happens we are reminded that the only thing we can count on is change.
It can seem as though making my paintings on the beach is a pointless act. But in reality, all acts are ‘pointless’ in that there is no inherent meaning. When we are able to stand tall and enthusiastically create from our hearts unencumbered by such concerns, aware that all our acts and achievements are but drops in the rain but engaging regardless, the offering becomes even more powerful, more poignant, more infectious. It doesn’t matter what we do- if it is done as an expression of love- that is its own validation and it is then a true offering to the world.
ST: Even if your beach murals have faded, they have made an impact on who has experienced them. Have you done collaborative beach murals with other artists? I got an idea- what about collage beach murals?! Your murals would be a perfect stage for a performance- instead of a curtain you can draw the next props to set the scene!
AA: I’ve done lots of collaboration. I love collaboration- the mixing up of ideas and abilities. At the moment I am collaborating with the director of the Santa Cruz Symphony. I am always open to interesting collaborations. And I have done performance within the artwork [see image below]. I look forward to other opportunities to do interesting things within the art I create.

‘This Constant Yearning’ dance performance
Over the years the art has dictated the documentation. As I got more serious about the art, I had to get more serious about the recording of it. I’m working on the next iteration of that trend as I shop the next level of camera I wish to use. I recently did a memorial ceremony artwork [see image below] that had about 200 participants, which was very powerful.
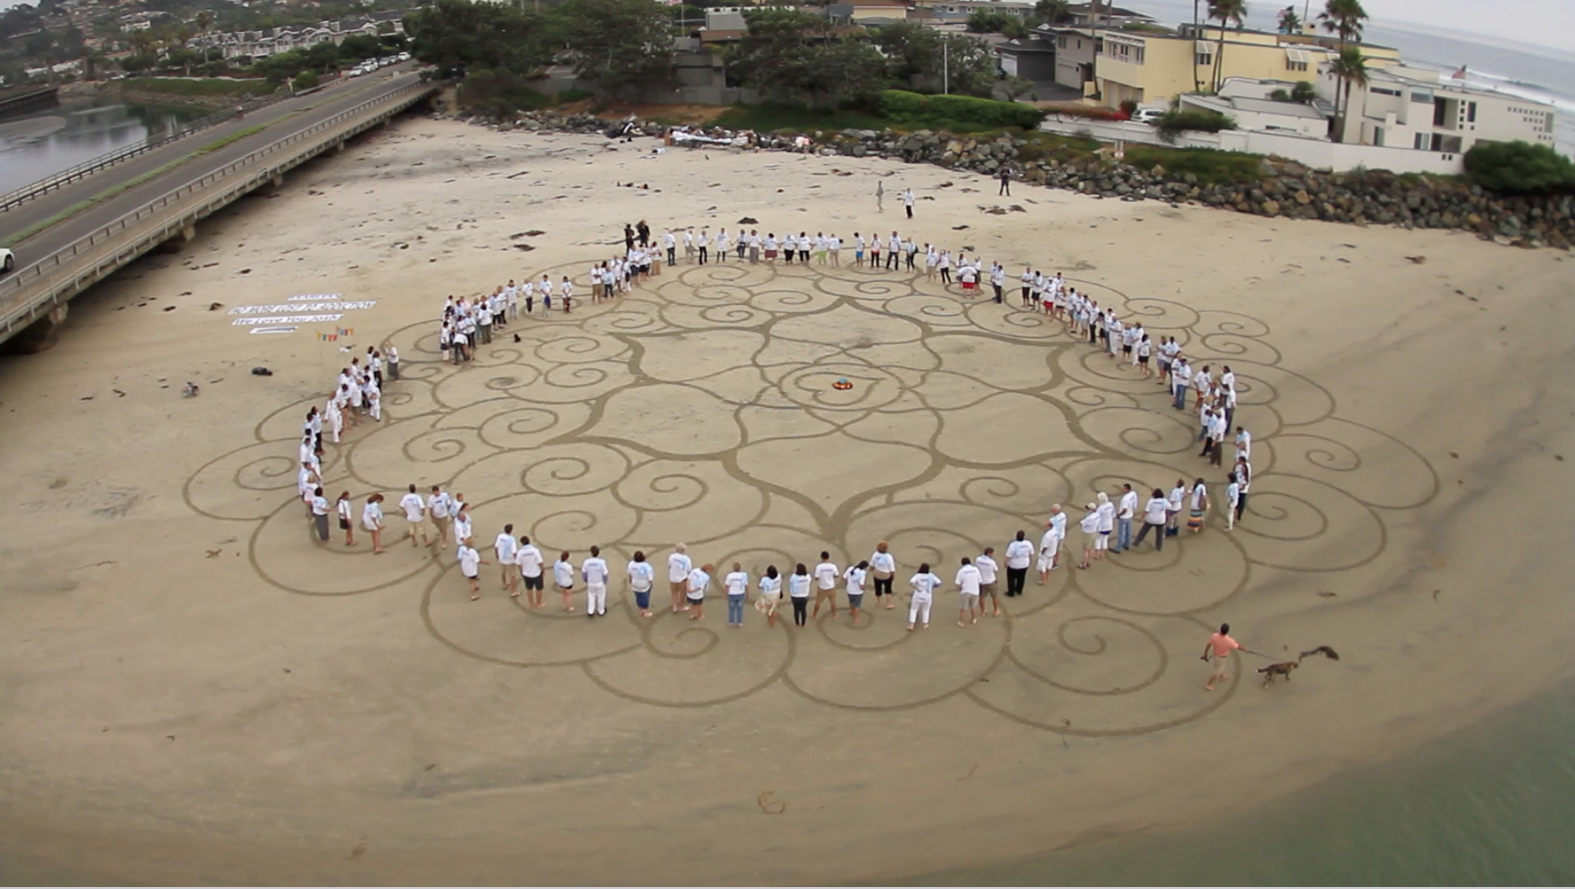
Ceremony artwork by Andres Amador
ST: Please tell us more about your Playa Painting Workshops. How can we get involved?
AA: I haven’t been as active with the workshops since I moved from the San Francisco bay Area. However I do work with groups and very much enjoy working with schools. I am also looking to do some very large creations for which I will be putting out calls for assistance. The best way to be involved with something I do is to join my facebook fan page:
ST: Thanks Andres for all your insight and inspiration! Scribblers, here’s an activity Andres came up for you to start with your own Earthscape Art. Click here to have a look. See you by the shore!


 Photo:
  Photo:
  Photo: Uploaded by
  Photo: “Fly Away Dandelions,”
  Photo: “Light Blue Wishes,” SVPPLY
 photo:
  Photo:


