Search This Blog!


Email

Spooky Pretzels

One of my favorite snack foods has got to be the pretzel. It’s crunchy and salty, it’s tasty on its own, and it pairs well with both sweet and savory ingredients. You can dip it in chocolate or cheese and both will be delicious (just not at the same time… unless you’re really adventurous).


Sometimes it’s fun to pick a favorite snack and then create variations on a theme with it. Here are a few different ideas for bringing Halloween flair to some yummy pretzel treats.


These pumpkin pretzels from Make Bake Celebrate are too cute for words! Chocolate-covered and dipped in sprinkles, they’re the perfect salty-sweet combination. Add leaves and stems with some piped chocolate for added detail.

 Chocolate Pumpkin Pretzels

Photo via Make Bake Celebrate


You can never have enough chocolate covered pretzels! For a fun variation on the same flavors, you must try these Frankenstein pretzels! Grab pretzel rods, green melting chocolate, black gel icing, chocolate kisses, and shredded coconut. With some simple assembly, you can make the perfect creepy cuties to compliment your bright pumpkin pretzels.

 Chocolate Pretzel Frankensteins

Photo via Simply Designing with Ashley


Finally, let’s finish up with a savory pretzel dish. With some pretzel sticks, string cheese, and chives for garnish, you can create the most adorable witches’ brooms. Cut up the string cheese to act as bristles, stick in a pretzel to be the handle, and tie on a chive if you like (you can skip this last part if you’re not a chive fan).

 Pretzel and Cheese Brooms

Photo via


Yum! These make perfect Halloween treats, but are also great festive snacks for any time—be it in the classroom, after school, or for a sleepover.


Which of these variations is your favorite? Do you have any other spooky snack ideas?

Print

In the Loop

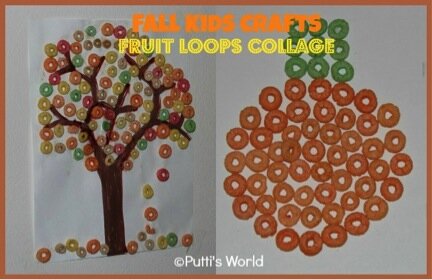
It’s not often you find art supplies you can also eat, but when you do… it’s sure to be a tasty crafting session! Because of their bright colors, Froot Loops are perfect for art projects. You can pretty much find an excuse to craft with them every time of year. Right now, try creating some autumn-themed pictures with subjects such as trees with changing leaves, pumpkins, maize, or apples.


For this project, grab some Froot Loops (and maybe Cheerios, depending on what colors your picture requires), glue, and some sturdy white paper. You’ll want a slightly thicker paper so it can handle the weight of the cereal. To round out your picture, you can also use paint and construction paper.


Before you start, take a pencil and create a rough outline of your drawing. If you want to use paint or colored paper, add it to your white paper first before starting with the cereal. Now, sort the colors you’ll need and arrange your Froot Loops on the page before gluing them down. Once they’re all glued, let the whole thing dry.


Finally, hang your fabulous picture up and eat the leftover Froot Loops!

  Froot Loops Fall CraftsPhoto via Putti’s World

 Froot Loops CornPhoto via Musings of Me


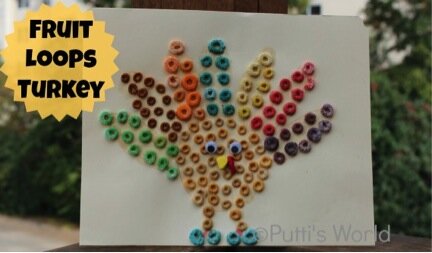
Bonus! If you want to get a head start for Thanksgiving…

 Froot Loops TurkeyPhoto via Putti’s World


You could create one of the ideas shown here or try something new. Work on a batch of Halloween themed Froot Loops drawings this week. What are you going to create with your Froot Loops? Do you have a favorite kind of food to craft with? Or a favorite craft to make with food?

Print
Posted by , on October 24th, 2013 at 2:37 am. No Comments

Category: Arts & Crafts,food art,holiday,kids Labels: , , , , , , , ,


Creepy Cuties

It’s just not Halloween until there are some sweet treats around! Save the wrapped candy for trick-or-treaters and add a little homemade flair for October festivities.


These spooky sweet treats are sure to be a hit!  All featuring marshmallows, they’re easy to make and more cute than creepy. With a few bags of marshmallows and some other simple ingredients, you can create your own rice krispies jack-o-lantern, chocolate and marshmallow witch, and marshmallow ghost.


These fun snacks provide the perfect balance of spooky and sweet—they’re festive without being scary—great for younger kids. Plus, since they mostly just require assembly, little ones can help you in the kitchen. They make perfect classroom snacks, Halloween party favors, or just festive desserts. For specific ingredient lists and directions, check out the source links.


Use the marshmallow as a binder for these deliciously sweet pumpkin rice krispies treats.

 Pumpkin Rice Krispies TreatsPhoto via Food Family Finds


No baking or cooking required! Just gather ingredients and assemble these spooktacular witches.

  Marshmallow & Chocolate Witches

Photo via Taste of Home


Keep things extra simple with these creepy-cute ghosts. All you need are marshmallows and an edible food pen (consider gel icing as a substitute).

 Marshmallow Ghosts

Photo via Cook Play Explore


What are your favorite Halloween treats to make?

Print
Posted by , on October 16th, 2013 at 11:55 pm. No Comments

Category: food art,holiday,kids Labels: , , , , , , ,


Playing with Food

It always seemed like the official party line at mealtime was, “Don’t play with your food!” Well, the times, they are a-changing… A creative movement sweeping across kitchens and social media everywhere lately is food art. By transforming ordinary dishes into extraordinary pictures, many cooks, parents, and artists have been turning each meal into a cultural experience.


With all the beautiful colors and textures found in different kinds of food, it seems quite natural to turn them into art. This makes food preparation an even more creative experience, plus meals become that much more fun to eat!  Bonus: it’s a great way to excite little ones about eating more healthy foods, like fruits and veggies. When the broccoli florets are forming the treetops in a magical forest, it’s a lot tougher to reject them!


You don’t have to be an expert chef to compose clever dishes. Just have fun seeing what picture you can create with what ingredients you have.  It’s more assembly than anything else. You’ll be amazed at what you come up with!


 Food Art by Samantha Lee

Photo via Samantha Lee, Eatzy Bitzy

 Food Art by Idafrosk (Instagram)

Photo by Idafrosk (Instagram), via Handmade Charlotte

 Food Art by bambini_pucillo (Instagram)

Photo by bambini_pucillo (Instagram) via POPSUGAR moms

The gorgeous final products prove that you can be creative just about anywhere. Let the refrigerator be your palette and the plate your canvas!


Have you given food art a try? Would you? Show us your creations!


Print
Posted by , on October 10th, 2013 at 8:54 pm. No Comments

Category: adults,food art,kids Labels: , , , , , , ,


Cap Off the Year with Chocolate

If you live in a college town or anywhere near a college campus, you know what time of year it is… GRADUATION!  It seems every other day this month, kids are receiving diplomas and throwing up their caps. And before you know it, next month it will be time for preschool, elementary, middle, and high school graduations. If you have any grads in your family, why not celebrate this milestone with some sweet treats?

Chocolate Graduation Caps Photo: Bakerella

These chocolate graduation caps are simple to create and easily customizable for school colors. You can make them chocolate lollipops or just clever candy sans the sticks, depending on your preference. To make them, you’ll need: miniature Reese’s Peanut Butter Cups, melting chocolate, chocolate squares (Dove or Godiva make good ones, but even small chocolate covered graham crackers or square chocolate covered wafers will do), miniature M&Ms, sour strings (Airheads Extremes Rainbow Berry Sweetly Sour Belts work great), and lollipop sticks (optional).


You can work in any order you prefer, but we’ll start with the top of the caps. Unwrap your chocolate squares and separate your sour belt ribbons by color. Choose the school color and cut or tear a small piece off (about an inch to an inch and a half in length—you can eyeball this). Draw a thin line of melted chocolate with a toothpick on the chocolate square from the center to an edge and glue on the sour belt string and a mini M&M to match.


Now for the bottom: chill your peanut butter cups in the freezer for a few minutes so the wrappers remove smoothly. If you’d like to make these as lollipops, let the cups return to room temperature (on a sheet of wax paper), then dip the end of a lollipop stick in melted chocolate and carefully insert it about halfway into the peanut butter cup and let it dry.

 Graduation Cap TreatsPhoto: Family Life with a Mom Who is All Hart

Once hardened, adhere the tops to the bottoms with some more melted chocolate and let dry. If they’re lollipops, stick them into a Styrofoam block to dry standing up. If they’re without sticks, leave them on the wax paper.


There you have it! Tasty, adorable, and celebratory treats worthy of your graduate! These are very easy to customize and substitute ingredients. For example, you could use icing or candy coating instead of melting chocolate and you could use pull-apart Twizzlers instead of sour belts. You could even use white chocolate for all the ingredients, so feel free to play around and see what you come up with. Congrats to all the classes of 2013 on their accomplishments and the many more to come.

Chocolate Graduation LollipopsPhoto: Bake Me More

Print
Posted by , on May 23rd, 2013 at 5:12 pm. No Comments

Category: Event,food art,kids Labels: , , Event, , graduation, sweets & treats


Bean Scene

For those who’ve been reading this blog for a while, you may remember how I sometimes see snacks in art. Well, call me crazy but there really are snacks in this art! Jelly Belly, the famous jellybean company decided that their tasty candy isn’t just for eating. It’s also for creating beautiful art!


Jelly Belly Candy Company commissions talented artists, such as Kristen Cumings, Malcolm West, and Peter Rocha, to create masterpieces entirely out of jellybeans. Some of these include already famous works of art, like the Mona Lisa originally by Leonardo da Vinci, Starry Night originally by Vincent Van Gogh, and American Gothic originally by Grant Wood. They also have portraits of pop culture icons and politicians, like Marilyn Monroe, Ronald Reagan, and Margaret Thatcher.


These impressive pieces are usually around 4 x 4 feet or 4 x 6 feet and can contain up to 12,000 jellybeans attached with spray adhesive. With Jelly Belly’s incredible variety of flavors, artists have so many options when matching shades and choosing color palettes. Consequently, these candy creations have a beautiful depth and precision worthy of a spot in any museum.


Want to get in on the sugar-filled creative action? Grab some jellybeans, glue, and cardboard and get started! It helps to give yourself an outline to work with (it will be covered by the beans anyway) and organize your colors a bit before starting. Or hey, why not make it entirely edible? Use some sort of baked good as your flat surface (a cake, brownie, or cupcake) and frosting as your adhesive.  This could be a perfect treat with Easter coming up. Yum!

The Starry Night, jellybean style by Kristen CumingsThe Starry Night by Kristen Cumings, original by Vincent van Gogh

Martin Luther King, Jr. jellybean portrait by Peter RochaMartin Luther King, Jr. by Peter Rocha

American Gothic, jellybean version by Kristen CumingsAmerican Gothic by Kisten Cumings, original by Grant Wood

Here’s a fascinating  inside how artist Kristen Cumings works on her jellybean creations.

To check out more Jelly Belly art, take a look at their website gallery. Have you every tried making art with edible materials? What food or candy do you think would make great art supplies?

Print
Posted by , on March 10th, 2013 at 6:30 pm. No Comments

Category: adults,Arts & Crafts,food art,holiday,kids Labels: , , , , , , ,


For Your Entertainmint

What are your feelings on candy canes? Come wintertime, they’re just all over the place. While they make lovely seasonal decorations, they often lead a lonely existence. Sure, every so often, someone will eat one, but that’s it. As a stand-alone snack, they’re fine, but imagine how yummy they’d be with some tasty partners in crime!


These adorable sled snacks from Gluesticks and Planning with Kids make a perfect treat for the kids… whether it’s for a party or just hanging at home. All you need are mini candy canes, some chocolate frosting, mini Milky Way bars, and Teddy Grahams.


Cut your Milky Way in half and use the chocolate frosting to adhere it to two candy canes for the sled. Then stick a Teddy Graham in between the chocolate bar halves for the driver. That’s all it takes!


Mmm… chocolate and peppermint that’s as tasty as it is adorable. Now, there’s a winning combination. On your marks. Get set. GO!


photo via Gluesticks

Print
Posted by , on November 28th, 2012 at 5:06 am. No Comments

Category: classroom,Event,food art,holiday,kids Labels: , , , , , , , , , ,


Talk about cute!!!!

So while I was surfing though the internet today, I came across one the CUTEST things I’ve seen in a long time. Now, what could be so cute you ask? How about a crafted treat that someone put a lot of thought and effort into to present breakfast to their loved one?

Check out this adorable Rice Teddy Bear wrapped in an egg blanket.

Isn’t that adorable?!

I found this on Light Flows In, who reblogged it from youpouch.com

I’m not sure what this will inspire me to create yet, but it definitely inspired the urge to get creative with my food!

What kinds of creative things do you make with your food?

Print
Posted by , on July 11th, 2012 at 10:24 pm. No Comments

Category: adults,Arts & Crafts,food art Labels: , , , bear, bear in a blanket, brown rice, , eggs, , , , scramled eggs, teddy bear, teddy in a blanket