Search This Blog!


Email

Pumpkins & Crayons

Pumpkin decorating doesn’t have to be dangerous or super messy (think knives, pumpkin guts, spray paint, etc). You can create unique, vibrant pumpkins with a few simple materials and some creativity.


When it comes to pumpkins and crayons, Alexa of The Swell Life really nailed it with two great decorating DIYs. Fun and colorful, both projects feature white pumpkins and a box of crayons. No carving necessary!


First off, how could we resist this DIY called the “Crayon Scribble Pumpkin”? All you’ll need to create your own are bright crayons and a white pumpkin (white displays color so much better)! This is perfect for kids of any age since there are no sharp tools or mess involved. Just grab your pumpkin and start coloring! Create a random colorful design, draw a face or picture, or work on an interesting pattern—there’s no limit to what you can do!


 Crayon Colored Pumpkin

Photo via The Swell Life


For a fun twist with the same tools, grab some glue and a hairdryer for this next version. Take your crayons and this time, remove the wrappers and break them in half (you won’t need a whole crayon for this). Glue them around the top of your pumpkin (again, white shows the colors better) and apply heat with a hairdryer set on high. There could be some crayon runoff, so you’ll want to lay down a garbage bag or tarp under your pumpkin.


 Melted Crayon Pumpkin

Photo via The Swell Life


You can customize your color palette—try orange and yellow for a candy corn theme, or purple and black for Halloween. For a really creepy version, try melting all red crayons—it’ll look amazing and dramatic for a haunted porch.


And that’s it! Two main materials, two great projects. Don’t forget to check out The Swell Life for tons more great pumpkin decorating projects. What fun ways do you like to decorate pumpkins? How would you customize these versions with crayons?

Print

Little Monsters

If you have younger kiddos, you know that Halloween is super fun, but can also mean tempering some of the extra scary stuff. Well, kooky meets spooky with these adorable tissue box monsters! If you want a great Halloween craft for some little ones that’s festive without being frightening, this is the one for you.


 Tissue Box Monster 1

Photo via A Girl and a Glue Gun

You’ll need empty tissue boxes (one per monster), but after that the decorations are up to you! A good decorating base is: some paper (construction, wrapping, computer, any will do), paint, glue, and scissors. For the creatures’ eyes, you can use cut up egg cartons, pom poms, paper, or googly eyes. Feel free to throw some glitter, stickers, feathers, markers, or pipe cleaners in the mix—whatever you have on hand will do.

Tissue Box Monster 2

Photo via Spoonful

Once you have all your materials set up… assemble! The box’s opening (once for tissues) should serve as the monster’s mouth, but how you align it is your call. Start by decorating the box, which serves as the creature’s base. If it needs to dry once it is complete, let it do so before adding eyes, arms, and legs.

Tissue Box Monster 3

Photo via Danielle’s Place

Explore colors, patterns, and shapes—they all add to your monster’s personality. Make it friendly! Or angry!  Be as creative or outrageous as you like. See if you can add fun details like hair, eyebrows or lashes, a tongue, moles, and teeth.


Once these crazy guys and gals are all finished and dry, you can play with them or add them to your Halloween display (or both!). Just Boo-ti-ful!

Print

Cute Candy Corn

Now that October has arrived, Halloween is on the horizon. That means costume planning, spooky decorations, and of course… candy and treats! Since it’s only the beginning of the month, one way to slowly start gearing up for the holiday is to incorporate things that work for both fall and Halloween.


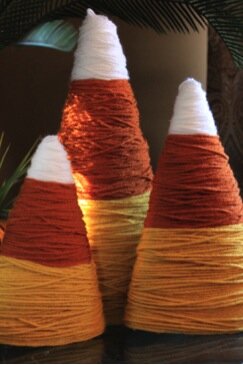
The perfect solution: a little candy corn décor! This quick and easy craft is perfect for setting the tone for October… plus it has pretty fall colors! Bonus: it’s simple and safe enough for kids to work on, as well.


 Yarn Candy Corn

Photo via Danielle, My Life as I Pin It


You’ll need yarn (white, yellow, and orange), scissors, glue, and a foam cone (in a pinch, you can create your own cone with some poster board and tape).


Start at the bottom with your yellow yarn. Glue the end to the foam (you may also be able to just tuck it in the back… depends on your cone) and start wrapping! Once you’ve gotten about a third of the way up, cut the yarn and glue or tuck in the end. Next up: orange! Repeat the process with your orange yarn, and finally finish up with white to the top. Tada!


 Yarn Candy Corn

Photo via Sarah, Thrifty Décor Chick


These candy cuties add some festive fun to any room without going too overtly “Halloween” too soon. But as the month goes on… look out! More delightfully spooky projects to come.

Print

Friday Fangs

Hello, hello and happy weekend everybody! With October in full swing, the Halloween decorations are starting to emerge. The classic Jack-o-Lantern is certainly tried and true, but I’m loving all the fun twists out there on the spooky pumpkin face. Some are funny, cute, silly, scary—but this one is all of those things at once!

How adorable is this vampire pumpkin? Nothing like a big set of chompers on a tiny pumpkin to get a laugh—and it’s super simple to make your own. For directions, check out the step-by-step tutorial from Martha Stewart. They even have a mouth template to cut the perfect size hole for plastic fangs!

Have you tried any clever twists on the classic Jack-o-Lantern? Got some in mind you’re going to try this year? We’d love to see!

Have a frightfully fabulous weekend!

Print
Posted by , on October 5th, 2012 at 9:54 pm. No Comments

Category: Arts & Crafts,holiday,kids Labels: , , fang halloween decoration, , , ,


Hallowine Bottles

So last week, we had a craft to make pumpkins look less like pumpkins. This week we’re trying to make bottles look more like pumpkins! What can I say? Decorations are just more fun when they come in unexpected or clever ways.


Today’s craft involves painting glass bottles. Empty wine and liquor bottles are usually pretty and a good size, but don’t be afraid to grab all different heights and widths. Aside from the bottles, you’ll need spray paint and black vinyl (you could also use black paint, but vinyl is easier). Other helpful tools are painter’s tape and Goo Gone.


Use the Goo Gone to remove any labels or residue on the bottles. For the Jack-o-Lantern design, tape off the stem of a red wine bottle (green glass). Spray paint the bottle orange. For a ghost, take a clear bottle and jazz it up with Frosted Glass spray paint. You could also use white paint, but the frosted glass gives it a real nice look. Cut out eyes and mouths out of black vinyl. Once the bottles are completely dry, stick them on.


If you’re feeling ambitious, you could also make a candy corn bottle. Spray paint the whole thing white, then the middle section orange and the bottom third yellow.

Photo: Nap Time Crafts

Photo: Instructables

Photo: Etsy

This fun craft could be perfect if you’re tight on space or looking for a festive table topper. Do you have any other fun Halloween themes to try painting on bottles? Share them here!

Print
Posted by , on October 1st, 2012 at 7:33 pm. No Comments

Category: adults,Arts & Crafts,kids Labels: , , , , ,