Search This Blog!


Email

Around the Globe

Happy (almost) Columbus Day, Scribblers! How are you planning to enjoy your long weekend? This holiday marks the anniversary of Christopher Columbus’ arrival to America in 1492. Everyone knows any good explorer always has a few tools on hand and a definite crucial one is a map.


It seems only right to embrace the adventurous spirit of the day with some fun DIY inspirations involving globes and maps! This is a great way to use souvenir maps from past trips or vacations, old atlases, and road maps; or breathe new life into broken or shabby globes with these exciting updates. Have fun exploring these cute and timely crafts on your day off!


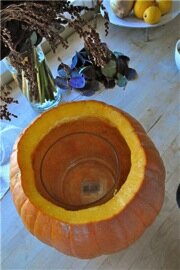
Take half a globe and turn it into a unique bowl. Globe Bowl

Photo via Better Homes and Gardens

Spread “peace” on earth with contact paper and spray paint.       Peace on Earth globe

Photo via Endlessly Inspired

Grab some maps and some modpodge and spruce up a piece of furniture with decoupage.

Decoupage Map Dresser

Photo via Shelterness

Decoupage Map Chair
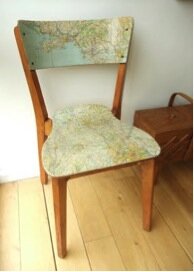
Photo via Roddy & Ginger

Save souvenir maps from vacations and cut them into shapes to display. Try butterflies or hearts.Map Butterflies

Photo via Image Surgery


Are you going to give any of these projects a try? How would you transform your old maps or globes?


Have a great Columbus Day everyone!

Print

Pumpkin Vase

One home decoration that’s in style all year long is the floral arrangement. Though the colors and variations may change depending on the season, fresh plants and flowers are never out of place on the table. This autumn, give your vase a seasonal update by using a pumpkin to hold your blooms.


You’ll need a pumpkin (orange, white, or otherwise… your pick!), a knife to carve, a glass or vase, and of course, your flowers.

 Natural pumpkin vase

photo via Mother-Daughter Press & Gay Bumgarner Images


Start by cutting a round opening on the top of your pumpkin—just large enough for the design you want to arrange, and to fit your glass inside. Gut the pumpkin and remove all the seeds and goop (I believe that is the official, scientific name for it… goop).


 Glass vase inside pumpkin

photo via Flower Duet


Once the inside of your pumpkin is nice and clean, fill your glass or small vase about halfway with water and place it inside the pumpkin. Finally, put your flowers in the glass and arrange as desired.


 White Pumpkin Vase

photo by Roberto Caruso via Chatelaine


Depending on how you carry out this project, the results can range from casually rustic to incredibly chic. Consider which look you want when you’re planning your centerpiece. Feel free to experiment with painting your pumpkin a different color and using various kinds of foliage or color schemes to bring your idea to life. This would make a beautiful Thanksgiving centerpiece or just a lovely addition to your table this fall.


Gold Pumpkin Vase

photo uploaded to Pinterest

What tips or tricks do you like using to give your space or décor a seasonal update?

Print
Posted by , on September 24th, 2013 at 10:18 pm. No Comments

Category: adults,Arts & Crafts,Design,food art,holiday,kids Labels: , decorate the table, , , flower pot, , home decor, , pumpkin glamour, pumpkin home decor craft


Soda Can Vases

Have you heard the phrase, “One man’s trash is another man’s treasure?” Well, sometimes your own trash is your own treasure! Crafts that utilize recycled materials are not only good for the environment, but they can look surprisingly chic and unique. For unexpectedly elegant and super cool flower vases, try painting some old soda cans. These mini vases are so striking that several companies manufacture porcelain versions to buy; however, you can make your very own in hardly any time for hardly any money!


For this project, all you’ll need are empty soda cans and white spray paint. Really… that’s it!


Wash the cans out thoroughly and dry them off (you don’t want any soda residue left inside). If you’d like some of them crushed a bit to add dimension, simply do so with your hands. Next, take the cans outside and spray paint them. White paint gives the project a very clean, modern look—a great contrast with the recycled can—but feel free to use whatever color appeals to you. Cover them in two or three coats of paint and let dry.


Finally, fill them with water, put a flower in each, and display!


 Soda Can Vases

Image via Indulgy

Recycled Can Vases

Image via Two’s Company


Even without flowers, these cans make an eye-catching, unique sculpture set.


This simple craft is a great example of turning the ordinary into something extraordinary and a wonderful way to enhance your recycling.

Print
Posted by , on July 19th, 2013 at 9:32 pm. No Comments

Category: adults,Arts & Crafts,Design,Found Art,kids Labels: , , , , home decor, , , spray paint, under $10, vase


Get Creative with Fall!

Hi Scribblers!

The beauty of Fall is without question. The smell of autumn, the changing colors of the leaves, the picturesque landscape scenes…what’s not to love? Here is a Fall inspired craft to bring that autumnal beauty into the home!

Autumn Leaf Wreath

To make this craft, simply have your little ones gather as many colorful leaves as they can. The freshly fallen leaves are best since they are the most pliable and have not yet dried out or curled.

To start, cut the center out of a paper plate. Punch a hole into either side of the rim of the plate. You will do this so that you you can tie a piece of yarn or string across it’s width. This will be used to hang your wreath when finished.

Trim the stems off of the leaves.

If you would like, you can paint your plate a fall color (red, orange, yellow) for added flair. Next, layer and glue down leaves with a hot glue gun starting with the largest leaves on the base of the plate.As you work your way around the plate and get to more layers of leaves, you can alternate between large and small sizes. Be sure to use as many bright colors as you can and heavily layer the leaves. As the leaves dry out they will shrink slightly.

Let glue dry, hang up your finished wreath and enjoy!

Print
Posted by , on November 7th, 2011 at 11:09 pm. No Comments

Category: adults,Arts & Crafts,classroom,kids Labels: , autumnal, , , , DIY wreath, , home decor, hot glue gun, leaf, leaves, paper plate, season, seasons, wreath