


Cute Candy Corn
Now that October has arrived, Halloween is on the horizon. That means costume planning, spooky decorations, and of course… candy and treats! Since it’s only the beginning of the month, one way to slowly start gearing up for the holiday is to incorporate things that work for both fall and Halloween.
The perfect solution: a little candy corn décor! This quick and easy craft is perfect for setting the tone for October… plus it has pretty fall colors! Bonus: it’s simple and safe enough for kids to work on, as well.
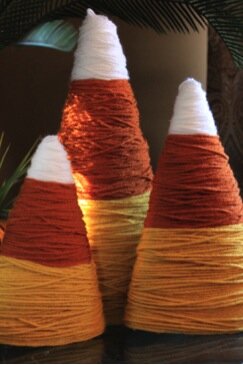
Photo via Danielle, My Life as I Pin It
You’ll need yarn (white, yellow, and orange), scissors, glue, and a foam cone (in a pinch, you can create your own cone with some poster board and tape).
Start at the bottom with your yellow yarn. Glue the end to the foam (you may also be able to just tuck it in the back… depends on your cone) and start wrapping! Once you’ve gotten about a third of the way up, cut the yarn and glue or tuck in the end. Next up: orange! Repeat the process with your orange yarn, and finally finish up with white to the top. Tada!

Photo via Sarah, Thrifty Décor Chick
These candy cuties add some festive fun to any room without going too overtly “Halloween” too soon. But as the month goes on… look out! More delightfully spooky projects to come.


 This craft was fun to make and it will be an easy activity to do with your kids!
 While the beans dry onto the plate, make leaf rubbings with your leaves and paper by following the instructions found in our Fall Family Tree craft.
 Glue “leaves” onto the green stick.
 Display somewhere festive for all to enjoy!
 Once you have made a good amount of leaves and cut them out, assemble and glue them on to a piece of white paper or card-stock.
 Write a welcome salutation. I choose to write “Welcome Fall,” but you could even write something like “Welcome to the Smith (Your Family’s Last Name) Family Home!”
 Get Creative and Colorful with this craft. Gathering leaves outside is a fun way to spend some time with the family! Once you’ve finished your craft, hang it somewhere for all to enjoy!
 Cover with another piece of paper. Rub across the paper covering the leaf by holding the crayon sideways.
 You can make your leaf rubbings more colorful (giving it more texture) by rubbing over the same leaf twice using two different colors.
 Make several different leaves making sure to have at least enough for the members of your family and a few extra for decoration. Cut out the leaves.
 Write down the names of the members of your family; one name per leaf.
 Tape the leaves onto the branch.
 Place in a vase and display for your family and visitors!
 Trim the stems off of the leaves.
 If you would like, you can paint your plate a fall color (red, orange, yellow) for added flair. Next, layer and glue down leaves with a hot glue gun starting with the largest leaves on the base of the plate.
 Let glue dry, hang up your finished wreath and enjoy!
 To make this colorful tree, simply flip through a few magazines with your little ones. Have them find ads that have colors in them that are common for Fall such as Red, Yellow, Orange, Burgandy, and maybe a little Green for added flare!
 Once you have cut out a generous amount of “leaves,” assemble them onto a piece of cardstock to look like a tree top. (If you do not have cardstock, you can create a sturdy piece or paper by gluing several pieces of construction paper together.)
 After you have glued all of your leaf pieces in places, cut out the border of any white cardstock that may be showing around the edges.
 Next, cut five 2″ slits into one end of an empty paper towel roll. Bend pieces out and staple onto a piece of cardboard to create a sturdy base.
 Cut two 2″ slits into the other end of the empty paper towel roll and insert cardstock covered in “leaves.”
 Add leaves to the top pieces of the empty papertowel roll to hide the top of the “trunk” and leaves at the base of the trunk to show fallen leaves.
 Enjoy!