Search This Blog!


Email

Pumpkins & Crayons

Pumpkin decorating doesn’t have to be dangerous or super messy (think knives, pumpkin guts, spray paint, etc). You can create unique, vibrant pumpkins with a few simple materials and some creativity.


When it comes to pumpkins and crayons, Alexa of The Swell Life really nailed it with two great decorating DIYs. Fun and colorful, both projects feature white pumpkins and a box of crayons. No carving necessary!


First off, how could we resist this DIY called the “Crayon Scribble Pumpkin”? All you’ll need to create your own are bright crayons and a white pumpkin (white displays color so much better)! This is perfect for kids of any age since there are no sharp tools or mess involved. Just grab your pumpkin and start coloring! Create a random colorful design, draw a face or picture, or work on an interesting pattern—there’s no limit to what you can do!


 Crayon Colored Pumpkin

Photo via The Swell Life


For a fun twist with the same tools, grab some glue and a hairdryer for this next version. Take your crayons and this time, remove the wrappers and break them in half (you won’t need a whole crayon for this). Glue them around the top of your pumpkin (again, white shows the colors better) and apply heat with a hairdryer set on high. There could be some crayon runoff, so you’ll want to lay down a garbage bag or tarp under your pumpkin.


 Melted Crayon Pumpkin

Photo via The Swell Life


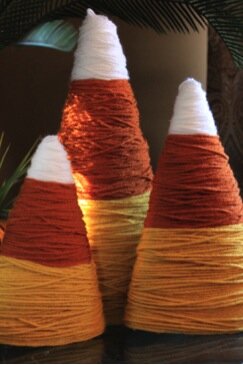
You can customize your color palette—try orange and yellow for a candy corn theme, or purple and black for Halloween. For a really creepy version, try melting all red crayons—it’ll look amazing and dramatic for a haunted porch.


And that’s it! Two main materials, two great projects. Don’t forget to check out The Swell Life for tons more great pumpkin decorating projects. What fun ways do you like to decorate pumpkins? How would you customize these versions with crayons?

Print

Cute Candy Corn

Now that October has arrived, Halloween is on the horizon. That means costume planning, spooky decorations, and of course… candy and treats! Since it’s only the beginning of the month, one way to slowly start gearing up for the holiday is to incorporate things that work for both fall and Halloween.


The perfect solution: a little candy corn décor! This quick and easy craft is perfect for setting the tone for October… plus it has pretty fall colors! Bonus: it’s simple and safe enough for kids to work on, as well.


 Yarn Candy Corn

Photo via Danielle, My Life as I Pin It


You’ll need yarn (white, yellow, and orange), scissors, glue, and a foam cone (in a pinch, you can create your own cone with some poster board and tape).


Start at the bottom with your yellow yarn. Glue the end to the foam (you may also be able to just tuck it in the back… depends on your cone) and start wrapping! Once you’ve gotten about a third of the way up, cut the yarn and glue or tuck in the end. Next up: orange! Repeat the process with your orange yarn, and finally finish up with white to the top. Tada!


 Yarn Candy Corn

Photo via Sarah, Thrifty Décor Chick


These candy cuties add some festive fun to any room without going too overtly “Halloween” too soon. But as the month goes on… look out! More delightfully spooky projects to come.

Print

Pumpkin Vase

One home decoration that’s in style all year long is the floral arrangement. Though the colors and variations may change depending on the season, fresh plants and flowers are never out of place on the table. This autumn, give your vase a seasonal update by using a pumpkin to hold your blooms.


You’ll need a pumpkin (orange, white, or otherwise… your pick!), a knife to carve, a glass or vase, and of course, your flowers.

 Natural pumpkin vase

photo via Mother-Daughter Press & Gay Bumgarner Images


Start by cutting a round opening on the top of your pumpkin—just large enough for the design you want to arrange, and to fit your glass inside. Gut the pumpkin and remove all the seeds and goop (I believe that is the official, scientific name for it… goop).


 Glass vase inside pumpkin

photo via Flower Duet


Once the inside of your pumpkin is nice and clean, fill your glass or small vase about halfway with water and place it inside the pumpkin. Finally, put your flowers in the glass and arrange as desired.


 White Pumpkin Vase

photo by Roberto Caruso via Chatelaine


Depending on how you carry out this project, the results can range from casually rustic to incredibly chic. Consider which look you want when you’re planning your centerpiece. Feel free to experiment with painting your pumpkin a different color and using various kinds of foliage or color schemes to bring your idea to life. This would make a beautiful Thanksgiving centerpiece or just a lovely addition to your table this fall.


Gold Pumpkin Vase

photo uploaded to Pinterest

What tips or tricks do you like using to give your space or décor a seasonal update?

Print
Posted by , on September 24th, 2013 at 10:18 pm. No Comments

Category: adults,Arts & Crafts,Design,food art,holiday,kids Labels: , decorate the table, , , flower pot, , home decor, , pumpkin glamour, pumpkin home decor craft


Inspired by Fall

Hi Scribblers!

Looking for inspiration and don’t know where to start? Check out our vast array of fall craft supplies specifically catered to help you craft you fall decor, treats, costumes and more!

Fall Crafts on Scribbleshop.com

We’ve been cooking up some fun Fall crafts and treats!

Last year we made ghoulish cupcakes and creative pumpkins!

Cute & Creepy family of Treats!

Thumbkin Pumpkin

Make a Thumbkin Pumpkin!

Click on the images for the tutorials! And as you’ve seen by recent posts, we’ve been really impressed with some crafts made by other craft bloggers!

Photo: Etsy

What will you make? We’d love to Know!


Print
Posted by , on October 9th, 2012 at 9:27 pm. No Comments

Category: adults,Arts & Crafts,food art,holiday Labels: adult crafts, , , Candycorn wine bottle, , , thumbkin pumpkin


Hello, Autumn!

Giuseppe Arcimboldo – Summer (1573)


Giuseppe Arcimboldo – Autumn (1573)

Well, it’s finally happened. Somewhere in the endless stretch of humid days, sun-kissed skin, and nightly cookouts, September snuck up on us. I don’t know about you, but I find that September—not January—always feels like the beginning of a new year. Whether you are a little one or have a little one, the new school year marks the passage of time more tangibly than midnight on a snowy winter night. With fresh school supplies and maybe a few new outfits, autumn feels like a natural beginning. A huge perk of this season for me is always the produce (leave it to me to think about food). Picking apples, carving pumpkins, sipping butternut squash soup… the list goes on. When it’s time to bid adieu to peaches and plums and say hello to apples and pumpkins… who better to inspire us than Giuseppe Arcimboldo? This bad boy right here defines the phrase, “an oldie but a goodie.” Painted in the sixteenth century (almost 500 years ago!), Arcimboldo’s innovative portraits are wildly creative and show that art can be technically masterful and have a funny bone. The seasonal produce painted in Summer and Autumn documents nature’s transition throughout the year (the series also includes portraits of Spring and Winter). Take a good look at his pictures and see how many different fruits and veggies you can spot! Do you have a favorite season? What makes you love it?

Print
Posted by , on September 6th, 2012 at 11:19 pm. No Comments

Category: adults,Arts & Crafts Labels: , arcimboldo, , , ,


Falling into Fall

Hi Scribblers!

As you walked your little ones to school to the bus today, did you notice something on the ground? LEAVES! That’s right, today I stepped on my first crunchy leaf of the season! I love the summer, but after the long summer, we were ready to welcome Fall!

It may not be official yet, but the change in seasons is a great opportunity to get crafty with your kids! Explain to them why the leaves change colors, tell the to observe the many shades of yellow and red and as the leaves start to fall, gather a few and bring them into your home! What will you make with the fall leaves? A wreath? A sign? A bouquet? Show us!

Print
Posted by , on September 4th, 2012 at 10:35 pm. No Comments

Category: Arts & Crafts,kids Labels: , , , ,


Inspired by Fall & M&M’s!

Hi Scribblers,

Yesterday, we put up a post about an M&M ad. In this ad, M&M’s were inspired by Fall and created Fall leaves out of Autumn colored M&M’s. Today, I was inspired by the M&M ad and made an Autumn tree made from magazine ads!

To make this colorful tree, simply flip through a few magazines with your little ones. Have them find ads that have colors in them that are common for Fall such as Red, Yellow, Orange, Burgandy, and maybe a little Green for added flare!

Next, help your little ones cut out leaf shapes from the magazine ads.

Once you have cut out a generous amount of “leaves,” assemble them onto a piece of cardstock to look like a tree top. (If you do not have cardstock, you can create a sturdy piece or paper by gluing several pieces of construction paper together.)

After you have glued all of your leaf pieces in places, cut out the border of any white cardstock that may be showing around the edges.

Next, cut five 2″ slits into one end of an empty paper towel roll. Bend pieces out and staple onto a piece of cardboard to create a sturdy base.

Cut two 2″ slits into the other end of the empty paper towel roll and insert cardstock covered in “leaves.”

Add leaves to the top pieces of the empty papertowel roll to hide the top of the “trunk” and leaves at the base of the trunk to show fallen leaves.

Enjoy!

Print
Posted by , on November 3rd, 2011 at 9:30 pm. 1 Comment

Category: Arts & Crafts,classroom,kids Labels: ad, ads, , , , clippings, , , , , , leaf, leaves, paper towel roll