


In the Loop
It’s not often you find art supplies you can also eat, but when you do… it’s sure to be a tasty crafting session! Because of their bright colors, Froot Loops are perfect for art projects. You can pretty much find an excuse to craft with them every time of year. Right now, try creating some autumn-themed pictures with subjects such as trees with changing leaves, pumpkins, maize, or apples.
For this project, grab some Froot Loops (and maybe Cheerios, depending on what colors your picture requires), glue, and some sturdy white paper. You’ll want a slightly thicker paper so it can handle the weight of the cereal. To round out your picture, you can also use paint and construction paper.
Before you start, take a pencil and create a rough outline of your drawing. If you want to use paint or colored paper, add it to your white paper first before starting with the cereal. Now, sort the colors you’ll need and arrange your Froot Loops on the page before gluing them down. Once they’re all glued, let the whole thing dry.
Finally, hang your fabulous picture up and eat the leftover Froot Loops!
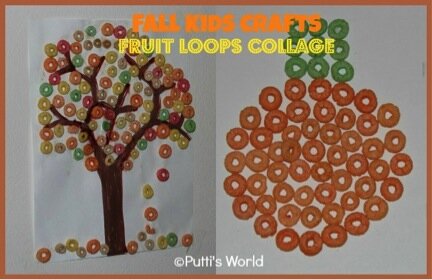 Photo via Putti’s World
 Photo via Musings of Me
Bonus! If you want to get a head start for Thanksgiving…
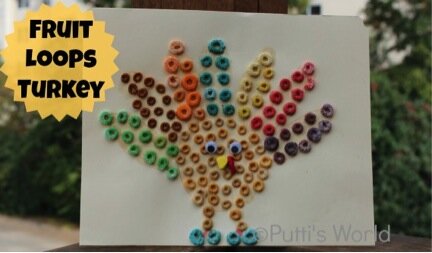 Photo via Putti’s World
You could create one of the ideas shown here or try something new. Work on a batch of Halloween themed Froot Loops drawings this week. What are you going to create with your Froot Loops? Do you have a favorite kind of food to craft with? Or a favorite craft to make with food?


 Photo via
  Photo via J. Day Designs
 Photo via

 The base of this sheep was made from the outline of a hand. This craft can be great to display on your fridge as a magnet or on your desk to remind you of them throughout the day.
 -White Foam (or Felt)
-Black Foam
-Googley Eyes
-Glitter
-Rubber Cement
-Glue
-White Foam (or Felt)
-Black Foam
-Googley Eyes
-Glitter
-Rubber Cement
-Glue
 Draw an outline similar to a cloud for the sheep’s body onto a piece of white foam. The foam piece should be large enough to cover the palm tracing to leave the fingers exposed. Glue the foam body piece to the palm tracing leave just the tips of the fingers exposed.
 Decorate the sheep’s body with curly designs using glitter and glue.
 Glue the googley eye onto the sheep’s face (the thumb). Add glitter embellishment for the hoofs of the sheep (other four fingers) and the face (thumb) using glitter and glue.
 Hang up the little sheep craft for everyone to enjoy!
 3. Wrap strips around your thumb.
 4. Glue the end of strip to the rolled up piece to close the circle.
 8. Cut three half inch strips of green construction paper about 4 inches long.
 10. Glue the three green pieces in between two of the orange circles.
 11. Cut a half inch strip out of brown construction paper about 2 inces long.
 14. Once everything has dried, place your Thumbkin Pumpkin somewhere as a decoration or hang in a window!