Search This Blog!


Email

Gingerbread Real Estate

Did you know gingerbread houses became popular in Germany during the 1800s after Hansel and Gretel was published? That’s pretty spectacular considering that in the fairytale, the beautifully edible house is used to lure two abandoned children into a witch’s trap. One wouldn’t think that makes a great selling point for creating confectionery cottages, but it seemed to really catch on and become a Christmas tradition. After all, that witch was on to something—she knew Hansel and Gretel couldn’t resist an enchanting gingerbread house… how could we expect anyone else to?


 Sweet and Simple Gingerbread House

Image via Shopgirl


This tasty craft comes in an array of sizes, shapes, and levels of difficulty. For those who need a bit of a head start, there are kits available to help create the basic structure. Others love starting from scratch and baking their own gingerbread. Some people take gingerbread houses so seriously that they create life-size structures or participate in competitions. Whatever your approach, this is definitely a fun and delicious activity to try on your own or with the whole family.


 Pretzel Log Cabins

Image via Worth Pinning


 Rice Crispy Cottages

Image via Land O Lakes


And don’t feel limited to gingerbread! Some folks have started branching out and using other delicious treats to build their homes’ foundations. Try pretzel rods to create the effect of wooden logs. Or use rice crispy treats to suggest stones or stucco. These houses can be as elaborate or simple as you want. Don’t underestimate the beauty of simple gingerbread and white frosting. For those who like a little more opulence, grab colorful candies and make a full-on edible estate! Piped icing, nuts, cereal, and candy canes also make excellent decorating supplies.


 Gingerbread Mansion

Image via Cake Central


What gingerbread house approach is your favorite? Clean and simple, cozy and colorful, or grand and luxurious?

Print
Posted by , on December 21st, 2013 at 10:52 pm. No Comments

Category: adults,Arts & Crafts,food art,holiday,kids Labels: , , , gingerbread, gingerbread houses, , ,


Snow Times Two

Winter may not technically arrive until December 21st, but once November ends, it seems that everybody begins embracing the holiday season. One of the biggest and most recognizable symbols of winter is undoubtedly snow. Now, no matter where you live or what the weather is like, you can bring a little snowfall inside your home with two different, fun decorating techniques.


For both of these tutorials, you’ll need a sewing needle and thread or fishing wire. The first technique also requires white paper and scissors. For the second, you’ll need cotton balls and glue (optional).

 Paper Snowflakes

Image via Paper & Stitch


The first technique is a classic with a twist. Paper snowflakes have been around forever, but usually you see them taped to windows. For a crafty update, try turning those paper flakes into a curtain of snow by hanging them in strands. First thing’s first: grab some white paper and cut out circles in different sizes. Trace things like plates, bowls, and cups for variation.  Then fold each circle and cut shapes to create snowflakes. You’ll need a lot of snowflakes, so feel free to get the whole family involved! Once you have your snowflakes, take a needle and thread and sew them together in strands; just a few stitches per flake will do it. Try varying the sizes for a more haphazard look. Once each strand is the length of your window, hang it from a curtain rod (or tape it to the head of the window) until the window’s width is covered. The resulting effect: falling snowflakes. Gorgeous, right?

 Cotton Ball SnowflakesImage via


Next up—a real oldie, but a goodie:  the cotton ball technique! This uses the same concept as above, but requires zero scissor work. Cut a piece of thread the length of your window and knot one end and thread the other. Separate your cotton balls into different sizes; puff some up so they look bigger, break others into equal parts and roll them so they’re smaller. String the cotton balls onto your thread, alternating the sizes for a natural look. Underneath each ball as it’s threaded, either make a knot or dab a tiny bit of glue so it stays in place. Be sure to leave space between each cotton ball so it resembles falling snow. Once one thread is full, hang it up, start your next thread, and repeat until the width of the window is covered. Again, the whole family can get in on the fun and the decorating will go that much faster!


Both of these delightful DIYs bring a little winter magic inside your home. Which technique are you excited to try?

Print
Posted by , on December 5th, 2013 at 12:05 am. No Comments

Category: adults,Arts & Crafts,Design,holiday,kids,Paper Art Labels: cotton balls, , , , , holiday decoration, , , paper snowflakes, snow, snowflakes, , winter crafts, winter wonderland


Thanksgivikkah Menorah

As you’ve probably heard, this year’s first night of Hanukkah falls right on Thanksgiving. This is an incredibly rare overlap in the Hebrew and Gregorian calendar that will only happen once in a lifetime. In fact, double holiday has unofficially been dubbed Thanksgivikkuh!


For those celebrating both holidays, it can be a lot to prepare for at once. As you get ready for Thanksgiving next week, don’t forget about Hanukkah!


To start things off, why not try making a recycled cardboard menorah?

 Cardboard MenorahImage via Chiro Mommy


You’ll need eight toilet paper tubes and one paper towel tube, paint, glue, decorating materials (stickers, glitter, whatever you want), and yellow tissue paper.


First, paint all of your cardboard tubes. Keep in mind that the taller one will serve as the shamash in the middle (if it’s a little too tall, trim it with scissors). You can paint them traditional Hanukkah colors (blue and white), Thanksgiving colors (brown, red, orange, yellow), a combination, or any colors you desire! Once the paint is dry, attach the tubes together with glue. Glue four tubes on one side of the shamash (paper towel roll) and four on the other. Finally, add decorations to your menorah!

  Wrapped Cardboard Menorah

Image via Making Friends

(Great alternative to paint: cover the tubes in wrapping paper or magazine pages.)


On the first night of Hanukkah, or the only night of Thanksgivikkah, display your creation proudly and use yellow tissue paper to create flames for the shamash and first candle. Add a tissue paper flame to a new candle each night of the Festival of Lights.


 Recycled Menorah

Image via Dim Sum, Bagels, and Crawfish


Are you excited for Thanksgiving and Hanukkah to overlap? What fun ways can you think of to commemorate this unique occurrence?

Print

Turkey Take 2!

Let’s keep the Thanksgiving momentum going with another fun turkey craft! If you missed yesterday’s variation, take a look here. Today’s turkey gets a beautiful, natural twist by using dried autumn leaves. It’s the perfect way to celebrate both the holiday and the season!


You’ll need leaves (dried and flattened), cardboard or brown cardstock, glue, and crayons. If you’d like to make some substitutions (synthetic leaves, googly eyes, construction paper, markers), go right ahead!

Leaf Turkey Image via Baby Center

 There are several ways you can approach this project, depending on your desired final product, so feel free to put your own stamp on it. Cut out a brown cardboard or cardstock circle for the turkey’s body. Then cut out a smaller circle to use as the head and glue it to the body. If you’re mounting this to a piece of paper, glue the body to your paper and leave a little space unglued at the top for leaves. Start arranging your leaves by sliding then behind the turkey’s body (in the unglued space) and gluing them down.

  Leaf TurkeyImage via My Creative Stirrings

 If you’d prefer to leave your turkey freestanding, just glue the leaves to the back of its body. Finally, add some facial features to your turkey’s head—cut out leaves to make a beak and waddle and use crayon or marker to draw its eyes.

 Leaf TurkeyImage via

 So cute, right? And it not only celebrates Thanksgiving, but really honors this beautiful time of year. Make sure to hang your turkey somewhere special as Thanksgiving approaches! What other Thanksgiving crafts are you looking forward to trying?

Print
Posted by , on November 15th, 2013 at 12:15 am. No Comments

Category: Arts & Crafts,holiday,kids,Paper Art Labels: , , , , , , , leaves, ,


Around the Globe

Happy (almost) Columbus Day, Scribblers! How are you planning to enjoy your long weekend? This holiday marks the anniversary of Christopher Columbus’ arrival to America in 1492. Everyone knows any good explorer always has a few tools on hand and a definite crucial one is a map.


It seems only right to embrace the adventurous spirit of the day with some fun DIY inspirations involving globes and maps! This is a great way to use souvenir maps from past trips or vacations, old atlases, and road maps; or breathe new life into broken or shabby globes with these exciting updates. Have fun exploring these cute and timely crafts on your day off!


Take half a globe and turn it into a unique bowl. Globe Bowl

Photo via Better Homes and Gardens

Spread “peace” on earth with contact paper and spray paint.       Peace on Earth globe

Photo via Endlessly Inspired

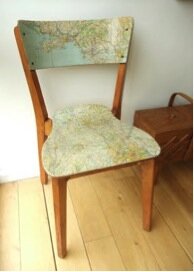
Grab some maps and some modpodge and spruce up a piece of furniture with decoupage.

Decoupage Map Dresser

Photo via Shelterness

Decoupage Map ChairPhoto via Roddy & Ginger

Save souvenir maps from vacations and cut them into shapes to display. Try butterflies or hearts.Map Butterflies

Photo via Image Surgery


Are you going to give any of these projects a try? How would you transform your old maps or globes?


Have a great Columbus Day everyone!

Print

Little Monsters

If you have younger kiddos, you know that Halloween is super fun, but can also mean tempering some of the extra scary stuff. Well, kooky meets spooky with these adorable tissue box monsters! If you want a great Halloween craft for some little ones that’s festive without being frightening, this is the one for you.


 Tissue Box Monster 1

Photo via A Girl and a Glue Gun

You’ll need empty tissue boxes (one per monster), but after that the decorations are up to you! A good decorating base is: some paper (construction, wrapping, computer, any will do), paint, glue, and scissors. For the creatures’ eyes, you can use cut up egg cartons, pom poms, paper, or googly eyes. Feel free to throw some glitter, stickers, feathers, markers, or pipe cleaners in the mix—whatever you have on hand will do.

Tissue Box Monster 2

Photo via Spoonful

Once you have all your materials set up… assemble! The box’s opening (once for tissues) should serve as the monster’s mouth, but how you align it is your call. Start by decorating the box, which serves as the creature’s base. If it needs to dry once it is complete, let it do so before adding eyes, arms, and legs.

Tissue Box Monster 3

Photo via Danielle’s Place

Explore colors, patterns, and shapes—they all add to your monster’s personality. Make it friendly! Or angry!  Be as creative or outrageous as you like. See if you can add fun details like hair, eyebrows or lashes, a tongue, moles, and teeth.


Once these crazy guys and gals are all finished and dry, you can play with them or add them to your Halloween display (or both!). Just Boo-ti-ful!

Print

Cute Candy Corn

Now that October has arrived, Halloween is on the horizon. That means costume planning, spooky decorations, and of course… candy and treats! Since it’s only the beginning of the month, one way to slowly start gearing up for the holiday is to incorporate things that work for both fall and Halloween.


The perfect solution: a little candy corn décor! This quick and easy craft is perfect for setting the tone for October… plus it has pretty fall colors! Bonus: it’s simple and safe enough for kids to work on, as well.


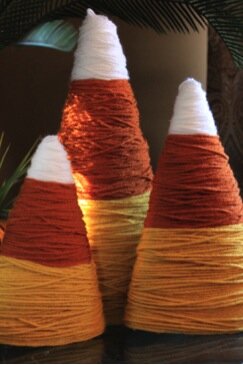
 Yarn Candy Corn

Photo via Danielle, My Life as I Pin It


You’ll need yarn (white, yellow, and orange), scissors, glue, and a foam cone (in a pinch, you can create your own cone with some poster board and tape).


Start at the bottom with your yellow yarn. Glue the end to the foam (you may also be able to just tuck it in the back… depends on your cone) and start wrapping! Once you’ve gotten about a third of the way up, cut the yarn and glue or tuck in the end. Next up: orange! Repeat the process with your orange yarn, and finally finish up with white to the top. Tada!


 Yarn Candy Corn

Photo via Sarah, Thrifty Décor Chick


These candy cuties add some festive fun to any room without going too overtly “Halloween” too soon. But as the month goes on… look out! More delightfully spooky projects to come.

Print

A Crafty Cup

Happy Passover to those celebrating! Boy oh boy, the holiday sure came early this year. We’re in the midst of a spring holiday marathon with St. Patrick’s Day, Passover, and Easter on consecutive weekends.


One important tradition of the Passover Seder is Elijah’s cup. Every year, we set out a glass of wine for the Prophet Elijah and open the front door to invite him in.  I remember Seders at my grandparents’ house when I was little. Elijah’s cup was always set at the kids’ table by the front door.


Since nobody is supposed to drink from Elijah’s cup, it’s mostly for show (and symbolism), so shouldn’t it look extra special? Why not have a little craft time to make a unique, beautiful, decorative cup to welcome Elijah to the Seder?


How you choose to decorate your cup is totally up to you! The one thing you’ll definitely need is a wine glass, either from a thrift store or dollar store (glass or plastic is fine). After that, you could use yarn, sequins, gems, tissue paper, stickers, paint, glitter, or anything else you can think of! Keep in mind whatever you use, you’ll probably need some glue or mod podge, paintbrushes, scissors and a flat workspace that can get a little messy. The best way to get glue on your wine glass is to use a paintbrush and paint it on. This will ensure an even, thin layer of glue that you can wrap yarn around, press tissue paper on, or sprinkle glitter over.


Take a look at these fabulous examples from some great blogs and feel free to click the source links for full tutorials.


Elijah's Cup with tissue paper and jewelsPhoto: She Knows

Elijah's Cup with yarn and sequinsPhoto: The Shiksa in the Kitchen


Print
Posted by , on March 25th, 2013 at 3:26 am. 1 Comment

Category: adults,Arts & Crafts,holiday,kids Labels: , , , , , , , , ,


Cute as a Button

Happy Greeting Card Season! Time to grab the address book and stamps and spread the well wishes to our loved ones. Of course there’s the classic route of vacation photos or professional portraits, but those can get a bit pricey. Why not make a card that’s cute, creative, personalized, and easy on the wallet?


To make these adorable ornament cards, you’ll need some cardstock and paper, a black marker, an assortment of colorful buttons, glue, and some optional rhinestones.


On a piece of paper (cut it in half and fit two to a page), draw several ornament strings and bows with your black marker (You can also purchase a string and bow stamp, but a marker works just as well!). Then glue buttons below the strings as ornaments. If you feel like adding a little sparkle, you can glue rhinestones on top of a few of the buttons. Then just add a little message and glue the paper to a folded sheet of cardstock.


Aren’t these precious? For another fabulous homemade card idea, check out our post over at Scribbleshop. You can also frame them for simple holiday decorations. Christmas cards don’t have to be fancy or expensive to make a splash… just heartfelt and creative!


Photo via Michelle Philippi


Photo via J. Day Designs

Photo via Splitcoast Stampers


Print

Turkey Feathers

Turkey Day is just around the corner! And how better to celebrate than with the mascot of Thanksgiving… the turkey! Here’s a fun, colorful, collage-tastic craft from A Girl and Glue Gun that just you or the whole family can enjoy!


Grab a stack of magazines, some cardstock (plain paper will also do the job), scissors, and glue.


On a white piece of paper, draw a simple outline of a turkey. Cut squares of cardstock and give some to each family member and let them pick a color (or a few) to be in charge of. You can make a color theme like autumn or rainbow.


Now everybody start cutting out magazine clips in their colors and cover the cardstock in them. Once all the squares are covered, cut them into the shape of feathers and one for the turkey’s body. Glue them down—start with feathers so they’re behind the body. You can use the cardstock scraps for details like feet, a beak, a wattle, and eyes.


And you’re all done—right in time for Thanksgiving. Now, no matter what you’re serving on Thursday, you’ll have the most stylish turkey on the block!


Turkey Feathers Collage

Magazine Collage Turkey

Photos via A Girl and a Glue Gun

Print
Posted by , on November 19th, 2012 at 4:31 am. No Comments

Category: Arts & Crafts,Found Art,holiday,kids Labels: , , , , , , ,