Search This Blog!


Email

Little Monsters

If you have younger kiddos, you know that Halloween is super fun, but can also mean tempering some of the extra scary stuff. Well, kooky meets spooky with these adorable tissue box monsters! If you want a great Halloween craft for some little ones that’s festive without being frightening, this is the one for you.


 Tissue Box Monster 1

Photo via A Girl and a Glue Gun

You’ll need empty tissue boxes (one per monster), but after that the decorations are up to you! A good decorating base is: some paper (construction, wrapping, computer, any will do), paint, glue, and scissors. For the creatures’ eyes, you can use cut up egg cartons, pom poms, paper, or googly eyes. Feel free to throw some glitter, stickers, feathers, markers, or pipe cleaners in the mix—whatever you have on hand will do.

Tissue Box Monster 2

Photo via Spoonful

Once you have all your materials set up… assemble! The box’s opening (once for tissues) should serve as the monster’s mouth, but how you align it is your call. Start by decorating the box, which serves as the creature’s base. If it needs to dry once it is complete, let it do so before adding eyes, arms, and legs.

Tissue Box Monster 3

Photo via Danielle’s Place

Explore colors, patterns, and shapes—they all add to your monster’s personality. Make it friendly! Or angry!  Be as creative or outrageous as you like. See if you can add fun details like hair, eyebrows or lashes, a tongue, moles, and teeth.


Once these crazy guys and gals are all finished and dry, you can play with them or add them to your Halloween display (or both!). Just Boo-ti-ful!

Print

Cute Candy Corn

Now that October has arrived, Halloween is on the horizon. That means costume planning, spooky decorations, and of course… candy and treats! Since it’s only the beginning of the month, one way to slowly start gearing up for the holiday is to incorporate things that work for both fall and Halloween.


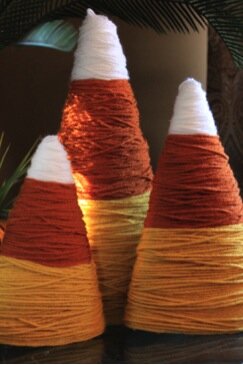
The perfect solution: a little candy corn décor! This quick and easy craft is perfect for setting the tone for October… plus it has pretty fall colors! Bonus: it’s simple and safe enough for kids to work on, as well.


 Yarn Candy Corn

Photo via Danielle, My Life as I Pin It


You’ll need yarn (white, yellow, and orange), scissors, glue, and a foam cone (in a pinch, you can create your own cone with some poster board and tape).


Start at the bottom with your yellow yarn. Glue the end to the foam (you may also be able to just tuck it in the back… depends on your cone) and start wrapping! Once you’ve gotten about a third of the way up, cut the yarn and glue or tuck in the end. Next up: orange! Repeat the process with your orange yarn, and finally finish up with white to the top. Tada!


 Yarn Candy Corn

Photo via Sarah, Thrifty Décor Chick


These candy cuties add some festive fun to any room without going too overtly “Halloween” too soon. But as the month goes on… look out! More delightfully spooky projects to come.

Print

Eggcellent Tattoos

Who’s ready to decorate some Easter eggs for this weekend?


The tradition of dyeing them with food coloring is certainly pretty and fun to do, but there’s nothing wrong with getting a little creative and trying some unique ways to adorn your little hardboiled canvases. We’ve been showcasing some fresh and fuss-free ideas to try this year. You can check out our post on permanent marker Easter eggs here.


Another super fun and simple technique? Using temporary tattoos! All you need are your hardboiled eggs (shells on), temporary tattoos, and a damp sponge. You can buy some designs that appeal to you or if you’re feeling ambitious, you can print graphics of your own choosing on temporary tattoo paper and cut them out (Country Living provides this link to purchase temporary tattoo paper). It takes a bit of patience to ensure you press the tattoo flatly on the egg—just hold it down with your damp washcloth for about thirty seconds. It transposes onto an eggshell the same way it does onto skin.


This is also perfect if you’re looking to maximize decoration and minimize cleanup.  It’s quick, easy, inexpensive, and looks impressive! Now that’s a winning combination. There are plenty of tattoos of butterflies and flowers to be found if you want to stick with images of spring, but feel free to pick out any tattoos you like. Maybe put a couple tattoos on the same egg to create a little scene.


Do you have any tips for mess-free, creative Easter egg decorations? Do you still prefer classic dyed eggs?


Photo: Country Living

Photo: Ramblings of a Formerly Rock’n’Roll Mum

Print
Posted by , on March 28th, 2013 at 10:25 pm. No Comments

Category: adults,Arts & Crafts,food art,holiday,kids Labels: , , , , , , , , ,


Scribble Shop is officially open!

Hi Scribblers!

You’ve seen the posts mentioning the launch of our new art and craft supply store….well, the day is finally here! Scribble Shop is open for business!!

At Scribble Shop, you will find over 75,000 items to meet all your crafting needs! Shop now to receive specials discounts on paint, yarn, craft books, kids art kits, food art, wreaths, decorations and more!

As a special discount for our Scribble readers, use promotional code SHOP1211 to receive an additional 10% off at checkout! Hurry quick- this special promo code is available until December 31st so shop now & save!


Print
Posted by , on December 9th, 2011 at 11:30 pm. No Comments

Category: adults,Arts & Crafts,,classroom,Featured,food art,Found Art,holiday,kids,Scribble Press Labels: , art kits, art supplies, art supplies online, , arts & crafts supplies, bloggers, , craft supply story, crafty kids, discount on art supplies, discount on crafts, discount on paint, featured, , found art, , , , holiday gifts, , kids art kits, liquitex paint, online art supplies, , promo code, promotional code, red heart yarn, , scribble press, , scribble shop launch, shop1211, straw wreath, wreath, wreaths,