Search This Blog!


Email

Colored Pencil Jewelry

Colored pencils aren’t just for drawing anymore! In fact, they make some pretty adorable jewelry. Showcase your love of art and color with these fun colored pencil pieces. Usually, colored pencils are used to create something pretty, but here the pencils get to take center stage. By cutting them into beads, you can make bright and unique necklaces, bracelets, brooches, and earrings.


To make the beads, you will need some basic tools: a junior hacksaw, fine sandpaper, a drill and small drill bit. Then of course you’ll need colored pencils and thread. For specific directions and necessary materials, check out Kate’s fabulous tutorial on Design Mom.


Grown-ups will definitely need to help prepare the beads (there’s a bit of sawing, sanding, and drilling involved), but kids will love stringing the beads and creating their own jewelry. It’s also a great way to play with color; pick a specific scheme, build a pattern, or make a rainbow!

 Colored Pencil Jewelry

Image (and tutorial) via Design Mom

 Colored Pencil Jewelry

Images via Etsy  one and two


This would make a great activity for a birthday party, class project, or just a rainy day.  It would also be a perfect homemade gift (the holidays are right around the corner… hint, hint). Artists, art enthusiasts, crafters, teachers, and kids would all appreciate this simple, yet impressive jewelry!


What other art inspired jewelry would you create?


Print
Posted by , on November 6th, 2013 at 1:09 am. No Comments

Category: adults,Arts & Crafts,classroom,kids Labels: , , , colored pencils, , ,


In the Loop

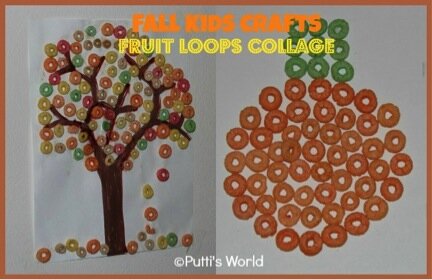
It’s not often you find art supplies you can also eat, but when you do… it’s sure to be a tasty crafting session! Because of their bright colors, Froot Loops are perfect for art projects. You can pretty much find an excuse to craft with them every time of year. Right now, try creating some autumn-themed pictures with subjects such as trees with changing leaves, pumpkins, maize, or apples.


For this project, grab some Froot Loops (and maybe Cheerios, depending on what colors your picture requires), glue, and some sturdy white paper. You’ll want a slightly thicker paper so it can handle the weight of the cereal. To round out your picture, you can also use paint and construction paper.


Before you start, take a pencil and create a rough outline of your drawing. If you want to use paint or colored paper, add it to your white paper first before starting with the cereal. Now, sort the colors you’ll need and arrange your Froot Loops on the page before gluing them down. Once they’re all glued, let the whole thing dry.


Finally, hang your fabulous picture up and eat the leftover Froot Loops!

  Froot Loops Fall CraftsPhoto via Putti’s World

 Froot Loops CornPhoto via Musings of Me


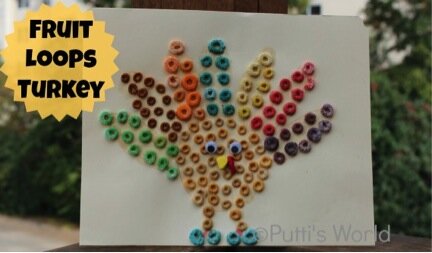
Bonus! If you want to get a head start for Thanksgiving…

 Froot Loops TurkeyPhoto via Putti’s World


You could create one of the ideas shown here or try something new. Work on a batch of Halloween themed Froot Loops drawings this week. What are you going to create with your Froot Loops? Do you have a favorite kind of food to craft with? Or a favorite craft to make with food?

Print
Posted by , on October 24th, 2013 at 2:37 am. No Comments

Category: Arts & Crafts,food art,holiday,kids Labels: , , , , , , , ,


Little Monsters

If you have younger kiddos, you know that Halloween is super fun, but can also mean tempering some of the extra scary stuff. Well, kooky meets spooky with these adorable tissue box monsters! If you want a great Halloween craft for some little ones that’s festive without being frightening, this is the one for you.


 Tissue Box Monster 1

Photo via A Girl and a Glue Gun

You’ll need empty tissue boxes (one per monster), but after that the decorations are up to you! A good decorating base is: some paper (construction, wrapping, computer, any will do), paint, glue, and scissors. For the creatures’ eyes, you can use cut up egg cartons, pom poms, paper, or googly eyes. Feel free to throw some glitter, stickers, feathers, markers, or pipe cleaners in the mix—whatever you have on hand will do.

Tissue Box Monster 2

Photo via Spoonful

Once you have all your materials set up… assemble! The box’s opening (once for tissues) should serve as the monster’s mouth, but how you align it is your call. Start by decorating the box, which serves as the creature’s base. If it needs to dry once it is complete, let it do so before adding eyes, arms, and legs.

Tissue Box Monster 3

Photo via Danielle’s Place

Explore colors, patterns, and shapes—they all add to your monster’s personality. Make it friendly! Or angry!  Be as creative or outrageous as you like. See if you can add fun details like hair, eyebrows or lashes, a tongue, moles, and teeth.


Once these crazy guys and gals are all finished and dry, you can play with them or add them to your Halloween display (or both!). Just Boo-ti-ful!

Print

Glitter Fireworks

The Fourth of July is a highlight of every summer. Barbeques, playing outside, parades—it’s all so much fun—but the best part each year has to be watching fireworks. The gorgeous, sparkling bursts of light are the perfect way to cap off the day’s celebrations for our country.

Get a head start by making your very own fireworks display. You’ll need black (or blue) construction paper, glue (that you can squeeze from a bottle), glitter in multiple colors, and scrap paper.

Glitter Fireworks

Photo: Activity Bucket

Put your sheet of construction paper over the scrap paper. Draw a firework design with your glue. If you want to try something different, you can squeeze out a small blob of glue and blow through a straw to spread the glue into a firework shape. Only glue the shapes you want in one color. Now pick your first color and sprinkle the glitter over the glue and slide the excess off onto the scrap paper. Move on to your next color and repeat the process. Before you know it you’ll have a night sky full of gorgeous bursts of color! Glitter Firworks on Blue

Photo: Le Top Blog

 Do you like to watch fireworks every year? What’s your favorite thing about the Fourth of July?

Print
Posted by , on June 30th, 2013 at 10:12 pm. No Comments

Category: Arts & Crafts,holiday,kids Labels: 4th of July, , fireworks, glitter, , , , summer


Sandy Lion at the Beach!

Now that it’s officially summer, you probably have plans to take your kids to the beach.  No need to take an extra bag with art supplies. With objects found on the beach and a little imagination your kids will have a fun day filled with creative inspiration from mother nature.

Your little Scribblers can create sculptures crafted with with stones, sand and seaweed and all kids of things that wash up from the ocean.

Pebble Fish by Richard Shilling

Pebble Fish by Richard Shilling

Here are some things to think about before creating your beach master piece.

Relax and take a good look around.

Take in the color, smells and textures of the air, water and sand.

Let the ocean speak to you then decide what you would like to create.

Select some objects and materials that you would like to use to make your art….sand, stones, seaweed, etc.

Get creative, draw designs in the sand by swirling the sand with a stick or your hand. 

Play with patterns, and textures.  You may want to use sea shells to create patterns in the sand or use a stick  to carve lines.

Take a look at this Sandy Lion – amazingly this sculpture is created completely from sand and seaweed! 

Lion On The Beach

Lion On The Beach – Gurnsey Arts Commission

I love this Rock Man.  How fun!  Some seaweed and rocks and there you have it!

Art in the sand can be created by using a rake, a stick, objects that wash up from the ocean.Think about the wonderful patterns that can be created when you use the sand as your canvas.

Beach Art by Andres Amador

Beach Art by Andres Amador

Try making art the next time you go to the beach and let us see what you and your kids come up with.

Please send us photos.  We’d love to share your creativity and inspiration with our readers!!!

Happy Scribbling!

Print
Posted by , on June 25th, 2013 at 6:36 pm. No Comments

Category: adults,Arts & Crafts,Design,kids,Uncategorized Labels: , Art at the beach, Beach crafts for kids, Beach sculptures, Create, , Designs in the sand, , kids art, , , , , , summer crafts


A Crafty Cup

Happy Passover to those celebrating! Boy oh boy, the holiday sure came early this year. We’re in the midst of a spring holiday marathon with St. Patrick’s Day, Passover, and Easter on consecutive weekends.


One important tradition of the Passover Seder is Elijah’s cup. Every year, we set out a glass of wine for the Prophet Elijah and open the front door to invite him in.  I remember Seders at my grandparents’ house when I was little. Elijah’s cup was always set at the kids’ table by the front door.


Since nobody is supposed to drink from Elijah’s cup, it’s mostly for show (and symbolism), so shouldn’t it look extra special? Why not have a little craft time to make a unique, beautiful, decorative cup to welcome Elijah to the Seder?


How you choose to decorate your cup is totally up to you! The one thing you’ll definitely need is a wine glass, either from a thrift store or dollar store (glass or plastic is fine). After that, you could use yarn, sequins, gems, tissue paper, stickers, paint, glitter, or anything else you can think of! Keep in mind whatever you use, you’ll probably need some glue or mod podge, paintbrushes, scissors and a flat workspace that can get a little messy. The best way to get glue on your wine glass is to use a paintbrush and paint it on. This will ensure an even, thin layer of glue that you can wrap yarn around, press tissue paper on, or sprinkle glitter over.


Take a look at these fabulous examples from some great blogs and feel free to click the source links for full tutorials.


Elijah's Cup with tissue paper and jewelsPhoto: She Knows

Elijah's Cup with yarn and sequinsPhoto: The Shiksa in the Kitchen


Print
Posted by , on March 25th, 2013 at 3:26 am. 1 Comment

Category: adults,Arts & Crafts,holiday,kids Labels: , , , , , , , , ,


Paper Tree

O Christmas tree, O Christmas tree… no, not the real ones with pine needles that are reach up to the ceiling! How about the ones made of paper that fit right on a page? This paper tree collage is a perfect rainy day or evening activity during the holiday season.


All you need is…. paper! Well, okay… paper, scissors (or a paper cutter if you have one at home), and glue. When it comes to paper, let’s specify. You’ll need a large sheet of white paper for your background and then a variety of paper scraps that include the color green. You could use construction paper, scrapbook paper, leftover wrapping paper… whatever you like!

Paper Christmas Tree

Cut your green paper into strips of different widths and lengths. Once you have a nice little pile, start stacking them on your white sheet, longest strips on the bottom. The rest can be random and don’t be afraid to mix your patterns and angles. Use a glue stick to adhere them down when you’re ready. If you like, you can cut out some ornaments, a brown tree trunk, and a star from construction paper to decorate your tree. Ta-da!

 Paper Christmas Tree

Quick, simple, and pretty! And your entire cleanup consists of sweeping any scraps of extra paper into a recycling bin. Display and enjoy!

Print
Posted by , on December 11th, 2012 at 5:44 am. No Comments

Category: Arts & Crafts,classroom,holiday,kids Labels: , , , , , , , , , , ,


Snow Cups

Well, this month is off to an unseasonably warm start. That’s making it all the tougher to really believe that it’s already December! But don’t be fooled—winter is here. Let’s just enjoy the mild days of December while we can because chilly air and snow can’t be far away.


Speaking of snow, how cute are these snowman cups? Becca of Blue Cricket Design created these adorable little guys with Styrofoam cups, some pink and black paint, and a little orange stiff felt.


With a small, round sponge and pink paint, dab some rosy cheeks onto your cup. Next, dip the back of a paintbrush in black paint and create the coal eyes and mouth. Finally, cut a triangle of orange stiff felt and hot glue it to the cup as the carrot nose! That’s all it takes! If you’re making a whole bunch, you can set up an assembly line and do each step in bulk one at a time.


Cute, cost-effective, and useful! These little guys are just perfect for milk and cookies or hot chocolate. They also make adorable carriers for classroom snacks or clever goodie bags (just stick lids on them)! And even in the nice weather, these snowmen won’t melt. Have fun!


Styrofoam Snowman Cups

Photo via Blue Cricket Design


Print
Posted by , on December 4th, 2012 at 4:03 am. No Comments

Category: adults,Arts & Crafts,classroom,holiday,kids Labels: , , , , , , , , ,


Another Rainy Day!

Hi Scribblers,

It’s another rainy day in Scribble Town!

How is the weather out by you? Rainy days are perfect for working on crafts for you or with the kids! I used to love coming home from school and sitting with Mom to work on little activities! We would color together, make friendship bracelets or sometimes made gifts for friends!

Not sure what to do with your kids? Check out the inspiration pages on Scribbleshop.com!

Print
Posted by , on May 15th, 2012 at 9:06 pm. No Comments

Category: adults,Arts & Crafts,kids Labels: , , , crafts with the kids, creative inspiration, friendship bracelets, , , , rainy days, , , scribbleshop


Make Your Own Bird Ornament!

Hi Scribblers!

Spring is here! Have you been enjoying the warm Spring weather? I just love the sounds of the birds chirping and seeing them on the freshly blossomed flowers.

With this fun activity sheet, you can make your own bird ornament to decorate any window or tree around your home.

Just click on the image, download and print!

Print
Posted by , on April 13th, 2012 at 9:37 pm. No Comments

Category: Arts & Crafts,classroom,kids Labels: , bird ornament, , , , , ,